A Step by Step guide on Containerizing Spring Boot CRUD RESTful API Application with Jib
Last modified: 25 Feb, 2020
Introduction
Containerization is process of packaging executable code along with the runtime environment which can be deployed on a virtual image. Docker is the de facto system for containerizing applications.
Docker needs us to create and maintain dockerfile, which we need to use to create the Docker image by running a Docker daemon as root, wait for builds to complete, and finally push the image to a remote registry or Docker Hub.
But this is cumbersome for Java developers who just want to build a Jar and have it deployed and bootstrapped in a container with very minimal steps. To address this challenge for Java developers, Google introduced Jib.
What is Jib?
Jib is open-source Java containerizer that lets Java developers build containers using the existing Java tools we use to build and package our application
Jib is a fast and simple container image builder that handles all the steps of packaging your application into a container image. It does not require us to write a Dockerfile or have docker installed, and can be included as plugin in Maven and Gradle which creates containerized Java application in no time.
Below images helps us to visualise the difference between the usual docker build flow against the jib build flow.
Docker build flow
Jib build flow
To summarize, Jib takes advantage of layering in Docker images and integrates with your build system to optimize Java container image builds in the following ways:
Simple- Jib is implemented in Java and runs as part of your Maven or Gradle build. You do not need to maintain a Dockerfile, run a Docker daemon, or even worry about creating a fat JAR with all its dependencies. Since Jib tightly integrates with your Java build, it has access to all the necessary information to package your application. Any variations in your Java build are automatically picked up during subsequent container builds.Fast- Jib takes advantage of image layering and registry caching to achieve fast, incremental builds. It reads your build config, organizes your application into distinct layers (dependencies, resources, classes) and only rebuilds and pushes the layers that have changed. When iterating quickly on a project, Jib can save valuable time on each build by only pushing your changed layers to the registry instead of your whole application.Reproducible- Jib supports building container images declaratively from your Maven and Gradle build metadata, and as such can be configured to create reproducible build images as long as your inputs remain the same.
Prerequisites
Having Docker installed on your machine is not necessary to containerize Java applications using Jib. But to test drive the image, we need to have Docker installed.
Install Docker on Windows 10 Home Edition
As Docker Desktop does not support Windows 10 Home Edition, we need to install Docker Toolbox for Windows. Follow the detailed steps provided here to get docker toolbox installed and configured.
If everything is installed and configured as suggested, running the below command should list the version of docker.
~:\> docker -v

Docker version 19.03.1, build 74b1e89e8a
Signup to Docker Hub
Running mvn jib:build or gradle jib command, Jib builds and pushes the image to Docker hub by default. To successfully push the image to docker hub, one has to signup with hub.docker.com and configure the credentials as mentioned in next step.
Login to docker to configure the credential store
The Docker Engine uses external credentials store to keep user credentials. Using an external store is more secure than storing credentials in the Docker configuration file.
To use a credentials store, we need an external helper program to interact with a specific keychain or external store. Docker requires the helper program to be in the host $PATH environment variable.
For configuring external helper on Windows, download the latest release docker-credential-wincred-VERSION-amd64.zip file from Microsoft Windows Credential Manager. Download the contents to any specific location E:\binaries\docker-credential-wincred-v0.6.3-amd64 and add to %PATH% environment variable.
Before proceeding further, run docker logout to remove the credentials if you are currently logged in. Run docker login and provide the credentials when prompted. If successful, config.json will be created under %HOME%\.docker and looks something like below:
{
    "auths": {
        "https://index.docker.io/v1/": {}
    },
    "HttpHeaders": {
        "User-Agent": "Docker-Client/19.03.1 (windows)"
    },
    "credsStore": "wincred"
}
wincred is the native binary credential store on windows where as its osxkeychain on macOS and pass on Linux.
Adding Jib to Application
Clone SpringBoot CRUD RESTful API application project
To try Jib, we need a working Java application which we can build, containerize, start and access it. Clone this project crud-rest-api-using-spring-boot-spring-data-jpa to quick start the learning.
Go through article A Step by Step guide to create CRUD RESTful APIs using Spring Boot + Spring Data JPA with H2 in-memory database for further details of the project.
Run below command to verify if the project is built and packaged successfully without any issues.
~:\> mvn clean package~:\> gradle clean buildMaven Configuration
Add jib-maven-plugin to pom.xml. Value configured for configuration > to > image will be the name of the container image built and deployed to docker hub.
  <build>
    <plugins>
      ...
      ...
      <plugin>
				<groupId>com.google.cloud.tools</groupId>
				<artifactId>jib-maven-plugin</artifactId>
				<version>2.0.0</version>
				<configuration>
					<to>
						<image>2much2learn/java8-spring-boot-crud-restful-api-with-jib</image>
					</to>
				</configuration>
			</plugin>
      ...
      ...
    </plugins>
  </build>
Gradle Configuration
Add com.google.cloud.tools.jib plugin to build.gradle. Value configured for jib.to.image will be the name of the container image built and deployed to docker hub.
plugins {
    ...
    ...
    ...
    id 'com.google.cloud.tools.jib' version '2.0.0'
}

jib.to.image = '2much2learn/java8-spring-boot-crud-restful-api-with-jib'
Extended Configuration
Jib provides many configurations to customize the image that is built. Go through Extended Usage for more details.
Of the whole, we can customize the image by using the below configuration for Java Applications.
<configuration>
  <from> (1)
    <image>openjdk:8u222-jre</image>
  </from>
  <to> (2)
    <image>localhost:5000/java8-spring-boot-crud-restful-api-with-jib</image>
    <credHelper>wincred</credHelper>
    <tags>
      <tag>customtag</tag>
      <tag>latest</tag>
    </tags>
  </to>
  <container>
    <jvmFlags> (3)
      <jvmFlag>-Xms512m</jvmFlag>
	  <jvmFlag>-Xmx2048m</jvmFlag>
      <jvmFlag>-Xdebug</jvmFlag>
	  <jvmFlag>-XX:+PrintGCDetails</jvmFlag>
	  <jvmFlag>-XX:+HeapDumpOnOutOfMemoryError</jvmFlag>
    </jvmFlags>
    <mainClass>com.toomuch2learn.springboot2.crud.catalogue.CrudCatalogueApplication</mainClass>
    <args>
      <arg>arg1</arg>
      <arg>arg2</arg>
    </args>
    <labels> (4)
      <key1>value1</key1>
      <key2>value2</key2>
    </labels>
  </container>
</configuration>jib {
(1) from {
image = 'openjdk:8u222-jre'
}
(2) to {
image = 'localhost:5000/java8-spring-boot-crud-restful-api-with-jib'
credHelper = 'wincred'
tags = ['customtag', 'latest']
}
container {
(3) jvmFlags = ['-Xms512m', '-Xmx2048m', '-Xdebug', '-XX:+PrintGCDetails', '-XX:+HeapDumpOnOutOfMemoryError']
mainClass = 'com.toomuch2learn.springboot2.crud.catalogue.CrudCatalogueApplication'
args = ['arg1', 'arg2']
(4) labels = [key1:'value1', key2:'value2']
}
}- The base image to be used
- Pushed to a local docker repository
- Runs by calling java -Xms512m -Xmx2048m -Xdebug -cp app/libs/*:app/resources:app/classes com.toomuch2learn.springboot2.crud.catalogue.CrudCatalogueApplication arg1 args
- Configure labels for applying metadata to the image created
Build the Container Image
To build the container image with jib, run the build command as below to compile the project and create and push the image.
~:\> mvn clean package jib:build

....
....
[INFO]
[INFO] Container entrypoint set to [java, -cp, /app/resources:/app/classes:/app/libs/*, com.toomuch2learn.springboot2.crud.catalogue.CrudCatalogueApplication]
[INFO]
[INFO] Built and pushed image as 2much2learn/java8-spring-boot-crud-restful-api-with-jib
[INFO] Executing tasks:
[INFO] [==============================] 100.0% complete
[INFO]
[INFO] ------------------------------------------------------------------------
[INFO] BUILD SUCCESS
[INFO] ------------------------------------------------------------------------
....
....~:\> gradle clean jib
....
....
Got output:
credentials not found in native keychain
Using credentials from Docker config (C:\Users\narra\.docker\config.json) for 2much2learn/java8-spring-boot-crud-restful-api-with-jib
Container entrypoint set to [java, -cp, /app/resources:/app/classes:/app/libs/*, com.toomuch2learn.springboot2.crud.catalogue.CrudCatalogueApplication]
Built and pushed image as 2much2learn/java8-spring-boot-crud-restful-api-with-jib
Executing tasks:
[=========================== ] 88.9% complete
> launching layer pushers
BUILD SUCCESSFUL in 5m 49s
5 actionable tasks: 4 executed, 1 up-to-dateImages created with above build commands will be pushed to the registry and will not be available unless it is pulled.
~:\> docker images
REPOSITORY          TAG                 IMAGE ID            CREATED             SIZE
hello-world         latest              fce289e99eb9        13 months ago       1.84kB
tomcat              8.0                 ef6a7c98d192        17 months ago       356MB

~:\> docker pull 2much2learn/java8-spring-boot-crud-restful-api-with-jib

~:\> docker images
REPOSITORY                                                TAG                 IMAGE ID            CREATED             SIZE
hello-world                                               latest              fce289e99eb9        13 months ago       1.84kB
tomcat                                                    8.0                 ef6a7c98d192        17 months ago       356MB
2much2learn/java8-spring-boot-crud-restful-api-with-jib   latest              e946277f08df        50 years ago        168MB
To create the image directly with Docker daemon and not pull it from registry, run the below build command.
~:/> docker image rm 2much2learn/java8-spring-boot-crud-restful-api-with-jib~:\> mvn clean package jib:dockerBuild~:\> gradle clean jibDockerBuild~:\> docker images
REPOSITORY TAG IMAGE ID CREATED SIZE
hello-world latest fce289e99eb9 13 months ago 1.84kB
tomcat 8.0 ef6a7c98d192 17 months ago 356MB
2much2learn/java8-spring-boot-crud-restful-api-with-jib latest e946277f08df 50 years ago 168MBRun the below command to inspect the image that is built by jib.
~:\> docker inspect 2much2learn/java8-spring-boot-crud-restful-api-with-jib

[
    {
        "Id": "sha256:e946277f08dfbc25a28f17a348544d96592b1d854d21f1c61fde316fe5703f62",
        "RepoTags": [
            "2much2learn/java8-spring-boot-crud-restful-api-with-jib:latest"
        ],
        "RepoDigests": [],
        "Parent": "",
        "Comment": "classes",
        "Created": "1970-01-01T00:00:00Z",
        "Container": "",
        ....
		....
		....
            "Env": [
                "PATH=/usr/local/sbin:/usr/local/bin:/usr/sbin:/usr/bin:/sbin:/bin",
                "SSL_CERT_FILE=/etc/ssl/certs/ca-certificates.crt",
                "JAVA_VERSION=8u242"
            ],
            "Cmd": null,
            "Image": "",
            "Volumes": {},
            "WorkingDir": "",
            "Entrypoint": [
                "java",
                "-cp",
                "/app/resources:/app/classes:/app/libs/*",
                "com.toomuch2learn.springboot2.crud.catalogue.CrudCatalogueApplication"
            ],
            "OnBuild": null,
            "Labels": {}
        },
        "Architecture": "amd64",
        "Os": "linux",
        "Size": 167980775,
        "VirtualSize": 167980775,
        ....
		....
		....
    }
]
Only part of the output is shown for reference. Of the whole, below are few which might need some insight:
Created - Checkout Why is my image created 48+ years ago? for more details.
Entrypoint - Command configured for entrypoint points to the
Java main classwhich should be bootstrapped to start the application usingjava.
Launching the Container
Run the below command to bootstrap the SpringBoot application.
~:\> docker run -p 8080:8080 -t 2much2learn/java8-spring-boot-crud-restful-api-with-jib~:\> docker run -e "SPRING_PROFILES_ACTIVE=dev" -p 8080:8080 -t 2much2learn/java8-spring-boot-crud-restful-api-with-jib~:\> $ docker run -e "JAVA_TOOL_OPTIONS=-agentlib:jdwp=transport=dt_socket,address=5005,server=y,suspend=n" -p 8080:8080 -p 5005:5005 -t 2much2learn/java8-spring-boot-crud-restful-api-with-jibThis should start the application running on port 8080 internally and also exposed on host’s port 8080.
Configure Port Forwarding Rules for VirtualBox Image
Before testing the application, we need to configure port forwarding for the default VirtualBox image that is created as part of the Docker setup on Windows 10 Home Edition. Follow the steps to configure port forwarding for ssh & port 8080 as below:
Right Click on the default image and choose
SettingsChoose
Network>Adapter1> expandAdvanced> clickPort ForwardingConfigure
Port Forwardingrules as below

Testing the running CRUD RESTful APIs via Postman
API testing tool Postman is one of the most popular tools available. The ease of Accessibility, creating environments & collections to persist test cases which validate the response status & body and Automated testing with Newman which is a command-line collection runner for Postman.
Below are the tests we execute to verify the application that is started. Ensure to add header Content-Type: application/json which is needed for most of the tests.
⭐ Download and refer to complete Postman Collection for all the below tests.
Application Health
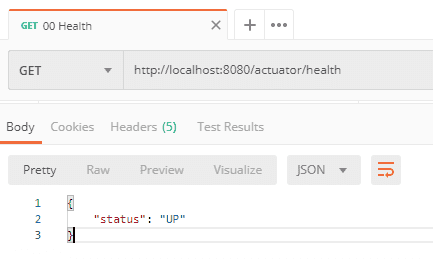
Spring Actuator exposes /health endpoint which will expose the status of the application.
Http Method: GET - Request Url: http://localhost:8080/actuator/health
Add Catalogue Item
Below are two postman requests which we will use to create Catalogue Items. One of the Catalogue item will be used to update it in the later tests.
Http Method: POST - Request Url: http://localhost:8080/api/v1/
{
	"sku": "CTLG-123-0001",
	"name": "The Avengers",
	"description": "Marvel's The Avengers Movie",
	"category": "Movies",
	"price": 0.0,
	"inventory": 0
}Get Catalogue Items
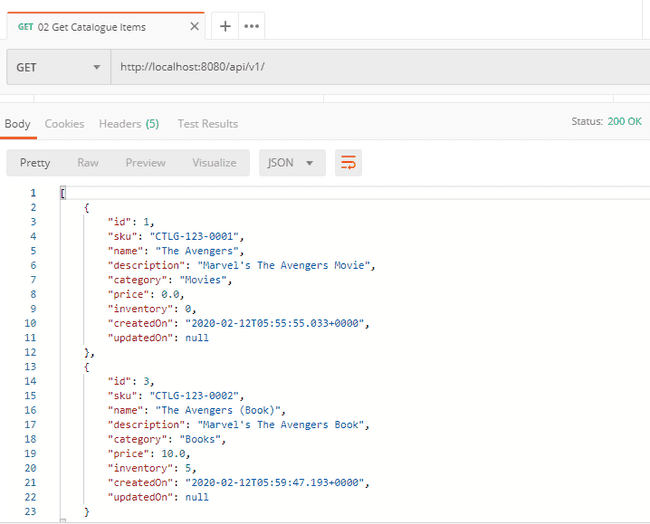
Get Catalogue Items that are persisted by the requests.
Http Method: GET - Request Url: http://localhost:8080/api/v1/
Update Catalogue Item
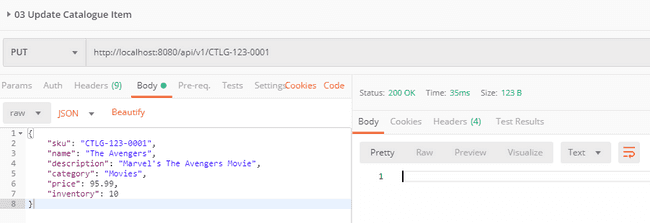
Update one of the Catalogue Item by its SKU number.
Http Method: PUT - Request Url: http://localhost:8080/api/v1/{sku}
{
	"sku": "CTLG-123-0001",
	"name": "The Avengers",
	"description": "Marvel's The Avengers Movie",
	"category": "Movies",
	"price": 95.99,
	"inventory": 10
}Get Catalogue Item by SKU
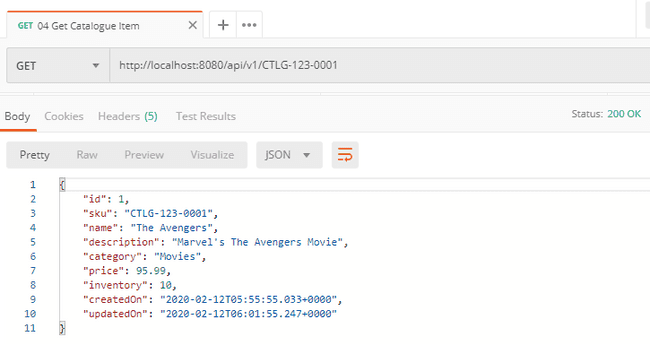
Get the updated Catalogue Item by its SKU. Verify if the fields that are updated compared to the add request is reflected in thus Get Request.
Http Method: GET - Request Url: http://localhost:8080/api/v1/{sku}
Delete Catalogue Item
Delete one of the Catalogue Item persisted earlier by its SKU.
Http Method: DELETE - Request Url: http://localhost:8080/api/v1/{sku}
Stopping the Container
As the container is started with -t option, output written by the application will be rendered on the console. Open up another console and run docker ps which lists containers that are currently running.
~:\> docker ps

CONTAINER ID        IMAGE                                                     COMMAND                  CREATED             STATUS              PORTS                    NAMES
4b91a669e106        2much2learn/java8-spring-boot-crud-restful-api-with-jib   "java -cp /app/resou…"   25 minutes ago      Up 25 minutes       0.0.0.0:8080->8080/tcp   nervous_knuth
Run command docker stop <CONTAINERID> to stop the container.
~:\> docker stop 4b91a669e106
4b91a669e106
Conclusion
In this article, we checked out how to build and publish docker images using Google’s Jib using Maven and Gradle. This minimizes lot of effort for Java Developers to build container images and testing them with ease without any hassle on setting up runtime environment and running the application.


