A Step by Step guide to create Reactive CRUD RESTful APIs using Spring Boot + Spring Data R2DBC with H2 in-memory database
Last modified: 31 Aug, 2020
Introduction
Spring Boot is Spring’s convention-over-configuration solution for creating stand-alone, production-grade Spring-based Applications that you can “just run”.
Some of Spring Boot feature are:
- Create stand-alone Spring applications
- Embed Tomcat or Jetty directly (no need to deploy WAR files)
- Provide opinionated ‘starter’ Project Object Models (POMs) to simplify your Maven configuration
- Automatically configure Spring whenever possible
- Provide production-ready features such as metrics, health checks and externalized configuration
- Absolutely no code generation and no requirement for XML configuration
This article is one stop guide for implementing Reactive Restful API service using Spring Boot powered with Spring Reactive Stack.
We will be implementing Catalogue Management Service, which includes Reactive RESTful APIs to Create, Read, Update and Delete Catalogue Items by their SKU (Stock Keeping Unit).
We will be using H2 Database along side with Reactive Relational Database Connectivity a.k.a R2DBC.
H2 Database is an in-memory runtime database that get created/initialized when application boots up and get destroyed when application shuts down.
R2DBC is based on Reactive Streams specification providing fully-reactive non-blocking APIs to work with SQL databases which is in contrast to the blocking nature of JDBC.
Article also includes detailed steps on
- Configuring
Maven&Gradlebuilds. - Add capability for Restart and LiveReload using
spring-boot-devtools. - Add capability for Production-ready features using
Spring Boot Actuator. - Implementing Reactive APIs using Spring’s
WebFluxwith@RestController. - Implement and test
Reactive Stream API. - Implement and test
Reactive Websocket API. - Global Exception Handling using
@ControllerAdvice. - Track API execution time using
@Aspect. - Validate API request using
Bean Validation APIand implementing custom Enum Validator. - Implementing tests with
Spring Testunderlied withJUnit5andMockito. - Configuring
JaCoCofor collecting Code Coverage metrics. - Test Reactive Restful APIs using
Postman.
But what is Reactive ?
Reactive in the context of software development and design, they generally mean one of below things:
- Reactive Systems (architecture and design)
- Reactive Programming (declarative event-based)
- Functional Reactive Programming (FRP)
- Reactive Streams (Standard)
Reactive System
The Reactive Manifesto is a document that defines the essential characteristics of the reactive systems to make them flexible, loosely-coupled and scalable.
- Responsive: A reactive system should provide a rapid and consistent response time and hence a consistent quality of service
- Resilient: A reactive system should remain responsive in case of random failures through replication and isolation
- Elastic: Such a system should remain responsive under unpredictable workloads through cost-effective scalability
- Message-Driven: It should rely on asynchronous message passing between system components
Reactive Systems is generally message-driven.
Reactive Programming
Reactive programming is all about handling asynchronous streams of data. It is concerned with data streams and the propagation of change.
The core of reactive programming is a data stream that we can observe and react to, even apply back pressure as well. This leads to non-blocking execution and hence to better scalability with fewer threads of execution.
In reactive programming, Observables emit data, and send it to the subscribers. This can be seen as data being PUSHed in reactive programming, as opposed to data being PULLed in imperative programming, where you explicitly request data (iterating over collection, requesting data from the DB, etc).
By being built around the core pillars of being fully asynchronous and non-blocking, Reactive Programming is an alternative to the more limited ways of doing asynchronous code in the JDK: namely Callback based APIs and Future.
Reactive programming is generally event-driven.
Functional Reactive Programming
Reactive programming, with the concept of Functional programming is termed as functional reactive programming a.k.a FRP.
FRP helps us to think about asynchronous programs (high-level abstractions), makes the flow of your application easier, and improves standard error handling (data structure = less code, less bugs). That is the reactive part. The functional part is the reactive extensions. Rx allow you to manipulate and combine streams of events. Together, that is really the power of functional reactive programming: the ability to combine functions, operate, and transform the stream of events.
Reactive Streams
Reactive Streams is an initiative to provide a standard for asynchronous stream processing with non-blocking back pressure. This encompasses efforts aimed at runtime environments (JVM and JavaScript) as well as network protocols.
The scope of Reactive Streams is to find a minimal set of interfaces, methods and protocols that will describe the necessary operations and entities to achieve the goal—asynchronous streams of data with non-blocking back pressure.
Semantics of the implementation is defined and maintained at reactive-streams.org.
For further deepdive, Dig into Understanding Reactive Programming and Reactive Streams
Why Spring WebFlux ?
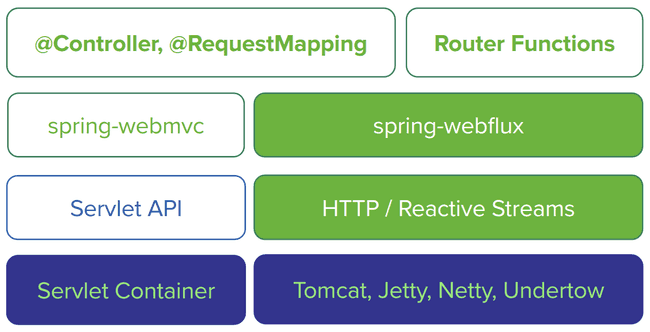
Spring WebFlux is module introduced as part of Spring Framework 5, which contains support for reactive HTTP and WebSocket clients as well as for reactive server web applications including REST, HTML browser, and WebSocket style interactions.
WebFlux can run on Servlet containers with support for the Servlet 3.1 Non-Blocking IO API as well as on other async runtimes such as Netty and Undertow.
Each runtime is adapted to a reactive ServerHttpRequest and ServerHttpResponse exposing the body of the request and response as Flux<DataBuffer>, rather than InputStream and OutputStream, with reactive backpressure.
REST-style JSON and XML serialization and deserialization is supported on top as a Flux<Object>, and so is HTML view rendering and Server-Sent Events.
WebFlux supports 2 distinct programming models:
- Annotation-based with
@Controllerand the other annotations supported also withSpring MVC. - Functional,
Java 8 lambdastyle routing and handling.
Catalogue Management System Restful APIs
We will be implementing the below CRUD Reactive Restful APIs to manage items for a Catalogue Management System.
| HTTP Method | API Name | Path | Response Status Code |
|---|---|---|---|
| POST | Create Catalogue Item | / | 201 (Created) |
| GET | Get Catalogue Items | / | 200 (Ok) |
| GET | Get Catalogue Item | /{sku} | 200 (Ok) |
| PUT | Update Catalogue Item | /{sku} | 200 (Ok) |
| DELETE | Delete Catalogue Item | /{sku} | 204 (No Content) |
| POST | Upload Catalog Item Picture | /{sku}/image | 201 (Created) |
With two additional capabilities to support publishing Streamed response with Backpressure and Websocket handler for publishing create/update events.
| HTTP Method | API Name | Path |
|---|---|---|
| Stream | Get Catalogue Items | /stream |
| WS | Catalogue Item Event | /ws/events |
Technology stack for implementing the Restful APIs...
- Redhat OpenJDK 11
- Spring Boot v2.3.3
- Spring Framework v5.2.8.RELEASE
- R2DBC H2 v0.8.4 with H2 In-memory Database
- Maven v3.6.3
- Gradle v6.6.1
- IntelliJ Idea v2020.2.1
Why use OpenJDK?
Oracle has announced that the Oracle JDK builds released after Jan 2019 cease to be free for commercial use.
An alternative is to use OpenJDK and effort is underway to make them fully interchangeable. A number of companies who are currently using Oracle JDK in production are making the decision to switch to OpenJDK or have already done so.
Why Red Hat’s Build of OpenJDK?
- Little to No Code Changes - OracleJDK and Red Hat’s implementation of OpenJDK are functionally very similar and should require little to no changes.
- Java Compliance - Red Hat OpenJDK is baselined from the OpenJDK project and TCK compliant.
- Multi-Platform Support - Red Hat OpenJDK is optimized for containers and supported on Windows and Linux.
Bootstrapping Project with Spring Initializr
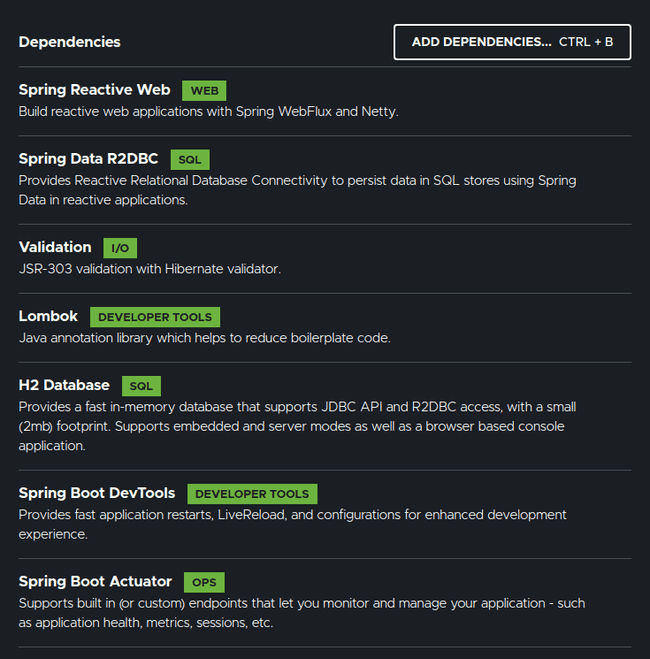
Spring Initializr generates spring boot project with just what we need to start implementing Restful services quickly. Initialize the project with appropriate details and the below dependencies.
- Spring Reactive Web
- Spring Data R2DBC
- H2 Database
- Lombok
- Validation
- Spring Dev Tools
- Spring Actuator
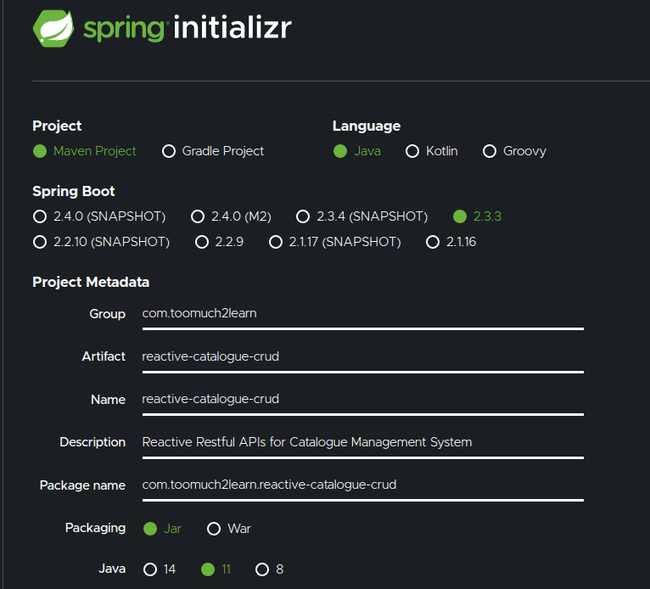
Click Here to download maven/gradle project with the above details and dependencies which we can use to start implementing Catalogue Management System Reactive Restful APIs.
Configure IntelliJ IDEA
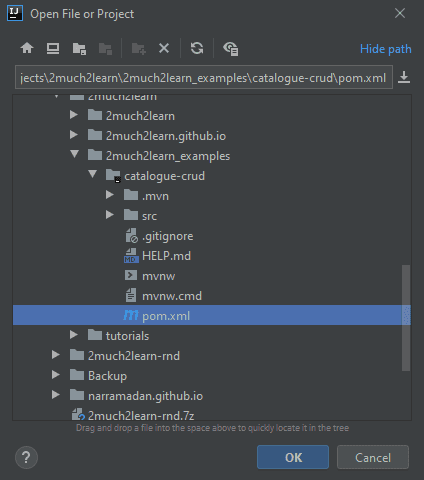
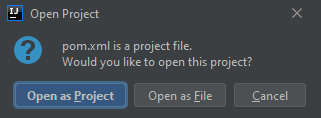
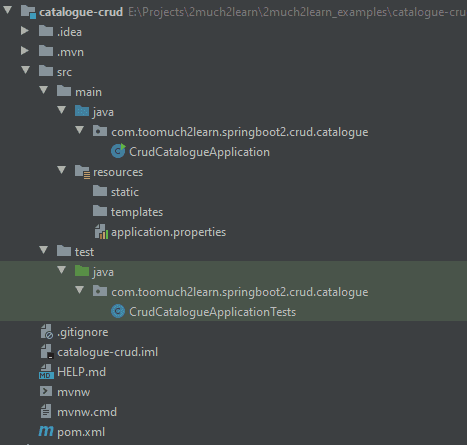
Extract the downloaded maven/gradle project achieve into specific location. Import the project into IntelliJ Idea by selecting pom.xml which will start downloading the dependencies.
This should show the below project structure
Post importing based on the build system being used, dependencies will be downloaded and ready for execution.
Using Project Lombok
We will be heavily relying on Project Lombok, which is a Java Library which makes our life happier and more productive by helping us to never write another getter or equals method again, constructors which are so repetitive. The way Lombok works is by plugging into our build process and autogenerating Java bytecode into our .class files as per a number of project annotations we introduce in our code.
Below is sample Lombok code for a POJO class:
@Data
@AllArgsConstructor
@RequiredArgsConstructor(staticName = "of")
public class CatalogueItem {

    private Long id;
    private String sku;
    private String name;
}@Datais a convenient shortcut annotation that bundles the features of@ToString,@EqualsAndHashCode,@Getter/@Setterand@RequiredArgsConstructorall together.@AllArgsConstructorgenerates a constructor with 1 parameter for each field in your class. Fields marked with @NonNull result in null checks on those parameters.@RequiredArgsConstructorgenerates a constructor with 1 parameter for each field that requires special handling.
IDE Plugins
Install Lombok plugin in IntelliJ Idea or Eclipse to start using the awesome features it provides.
Replace application.properties with application.yml
YAML is a superset of JSON, and as such is a very convenient format for specifying hierarchical configuration data. The SpringApplication class will automatically support YAML as an alternative to properties file when SnakeYAML is added as dependency in classpath.
Replace application.properties with application.yml under src/main/resources.
Add SnakeYAML as dependency in pom.xml.
<dependency>
    <groupId>org.yaml</groupId>
    <artifactId>snakeyaml</artifactId>
    <version>1.25</version>
</dependency>
Additional Capabilities added to application
Below are few capabilities that are added to support implementing the application
Bean Validation API & Hibernate Validator
Validating input passed in the request is very basic need in any implementation. There is a de-facto standard for this kind of validation handling defined in JSR 380.
JSR 380 is a specification of the Java API for bean validation which ensures that the properties of a bean meet specific criteria, using annotations such as @NotNull, @Min, and @Max.
Bean Validation 2.0 is leveraging the new language features and API additions of Java 8 for the purposes of validation by supporting annotations for new types like Optional and LocalDate.
Hibernate Validator is the reference implementation of the validation API. This should be included along side of validation-api dependency which contains the standard validation APIs.
Dependencies will be provisioned with spring-boot-starter-validation artifact.
<dependency>
  <groupId>org.springframework.boot</groupId>
  <artifactId>spring-boot-starter-validation</artifactId>
</dependency>
Spring Boot Actuator
Spring Boot Actuator will be included in the project archive that is generated using Spring Initializr. Actuator brings production-ready features to our application.
The main features that will be added to our API are
/health endpoint
The health endpoint is used to check the health or state of the application that is running. This endpoint is generally configured with some monitoring tools to notify us if the instance is running as expected or goes down or behaving unusual for any particular reasons like Connectivity issues with Database, lack of disk space, etc.,
Below is the default response that would showup upon accessing /actuator/health endpoint if application is started successfully
{
    "status" : "UP"
}
HealthIndicator is the interface which is used to collect the health information from all the implementing beans. Custom health indicator can be implemented to expose additional information.
/info endpoint
The info endpoint will display the information of the API based upon the configurations defined in properties or yaml file. Below is the information that is configured for this API and the response that would showup upon accessing /actuator/info endpoint.
# Catalogue Management Service Restful APIs
info:
  app:
    name: Spring Sample Application
    description: This is my first spring boot application
version: 1.0.0{
"app": {
"name": "Spring Sample Application",
"description": "This is my first spring boot application",
"version": "1.0.0"
}
}/metrics endpoint
The metrics endpoint publishes information about OS, JVM as well as application level metrics.
By default, only health and info endpoints are enabled. For metrics to work, the below configuration should be added to application.yml.
# Spring boot actuator configurations
management:
  endpoints:
    web:
      exposure:
        include: health, info, metrics
Accessing /actuator/metrics/ will list down all the available metrics as shown below that can be queries through actuator.
{
  "names": [
      "jvm.threads.states",
      "jdbc.connections.active",
      "jvm.gc.memory.promoted",
      "jvm.memory.max",
      "jvm.memory.used",
      "jvm.gc.max.data.size",
      "jdbc.connections.max",
      ....
      ....
      ....
  ]
}
To query a specific metric, access /actuator/metrics/{metric-name} replacing metric-name with one that is available in the list of metrics. Below is sample response retrieved when accessing /actuator/metrics/jvm.memory.used
{
    "name": "jvm.memory.used",
    "description": "The amount of used memory",
    "baseUnit": "bytes",
    "measurements": [
        {
            "statistic": "VALUE",
            "value": 1.18750416E8
        }
    ],
    "availableTags": [
        {
            "tag": "area",
            "values": [
                "heap",
                "nonheap"
            ]
        },
        {
            "tag": "id",
            "values": [
                "G1 Old Gen",
                "CodeHeap 'non-profiled nmethods'",
                "G1 Survivor Space",
                "Compressed Class Space",
                "Metaspace",
                "G1 Eden Space",
                "CodeHeap 'non-nmethods'"
            ]
        }
    ]
}
And many more..
Likewise to health, info, metrics, there are many more endpoints when additional capabilities are added like sessions, liquibase, flyway etc.,
Click here for the complete list of endpoints that provided to monitor and interact with the application.
Updating Maven and Gradle files
Below is pom.xml and build.gradle defined with all the dependencies and plugins needed for this application.
Maven
<?xml version="1.0" encoding="UTF-8"?>
<project xmlns="http://maven.apache.org/POM/4.0.0" xmlns:xsi="http://www.w3.org/2001/XMLSchema-instance"
	xsi:schemaLocation="http://maven.apache.org/POM/4.0.0 https://maven.apache.org/xsd/maven-4.0.0.xsd">
	<modelVersion>4.0.0</modelVersion>
	<parent>
		<groupId>org.springframework.boot</groupId>
		<artifactId>spring-boot-starter-parent</artifactId>
		<version>2.3.3.RELEASE</version>
		<relativePath/> <!-- lookup parent from repository -->
	</parent>
	<groupId>com.toomuch2learn</groupId>
	<artifactId>spring-reactive-catalogue-crud</artifactId>
	<version>0.0.1-SNAPSHOT</version>
	<name>spring-reactive-catalogue-crud</name>
	<description>Spring Reactive Restful APIs for Catalogue Management System</description>

	<properties>
		<java.version>11</java.version>
	</properties>

	<dependencies>
		<dependency>
			<groupId>org.springframework.boot</groupId>
			<artifactId>spring-boot-starter-actuator</artifactId>
		</dependency>
		<dependency>
			<groupId>org.springframework.boot</groupId>
			<artifactId>spring-boot-starter-data-r2dbc</artifactId>
		</dependency>
		<dependency>
			<groupId>org.springframework.boot</groupId>
			<artifactId>spring-boot-starter-validation</artifactId>
		</dependency>
		<dependency>
			<groupId>org.springframework.boot</groupId>
			<artifactId>spring-boot-starter-webflux</artifactId>
		</dependency>
		<dependency>
			<groupId>org.springframework.boot</groupId>
			<artifactId>spring-boot-starter-aop</artifactId>
		</dependency>

		<dependency>
			<groupId>org.springframework.boot</groupId>
			<artifactId>spring-boot-devtools</artifactId>
			<scope>runtime</scope>
			<optional>true</optional>
		</dependency>
		<dependency>
			<groupId>com.h2database</groupId>
			<artifactId>h2</artifactId>
			<scope>runtime</scope>
		</dependency>
		<dependency>
			<groupId>io.r2dbc</groupId>
			<artifactId>r2dbc-h2</artifactId>
			<scope>runtime</scope>
		</dependency>
		<dependency>
			<groupId>org.projectlombok</groupId>
			<artifactId>lombok</artifactId>
			<optional>true</optional>
		</dependency>
		<dependency>
			<groupId>org.yaml</groupId>
			<artifactId>snakeyaml</artifactId>
			<version>1.25</version>
		</dependency>
		<dependency>
			<groupId>com.fasterxml.jackson.datatype</groupId>
			<artifactId>jackson-datatype-jsr310</artifactId>
		</dependency>

		<dependency>
			<groupId>org.springframework.boot</groupId>
			<artifactId>spring-boot-starter-test</artifactId>
			<scope>test</scope>
			<exclusions>
				<exclusion>
					<groupId>org.junit.vintage</groupId>
					<artifactId>junit-vintage-engine</artifactId>
				</exclusion>
			</exclusions>
		</dependency>
		<dependency>
			<groupId>io.projectreactor</groupId>
			<artifactId>reactor-test</artifactId>
			<scope>test</scope>
		</dependency>
	</dependencies>

	<build>
		<plugins>
			<plugin>
				<groupId>org.springframework.boot</groupId>
				<artifactId>spring-boot-maven-plugin</artifactId>
			</plugin>
			<plugin>
				<groupId>org.jacoco</groupId>
				<artifactId>jacoco-maven-plugin</artifactId>
				<version>0.8.5</version>
				<executions>
					<execution>
						<goals>
							<goal>prepare-agent</goal>
						</goals>
					</execution>
					<execution>
						<id>report</id>
						<phase>test</phase>
						<goals>
							<goal>report</goal>
						</goals>
					</execution>
				</executions>
			</plugin>
		</plugins>
	</build>
</project>
Gradle
plugins {
	id 'org.springframework.boot' version '2.3.3.RELEASE'
	id 'io.spring.dependency-management' version '1.0.10.RELEASE'
	id 'java'
	id 'jacoco'
}

group = 'com.toomuch2learn'
version = '0.0.1-SNAPSHOT'
sourceCompatibility = '11'

configurations {
	compileOnly {
		extendsFrom annotationProcessor
	}
}

repositories {
	mavenCentral()
}

jacocoTestReport {
    reports {
        html.destination file("${buildDir}/jacocoHtml")
    }
}

dependencies {
	implementation 'org.springframework.boot:spring-boot-starter-actuator'
	implementation 'org.springframework.boot:spring-boot-starter-data-r2dbc'
	implementation 'org.springframework.boot:spring-boot-starter-validation'
	implementation 'org.springframework.boot:spring-boot-starter-webflux'
	compileOnly 'org.projectlombok:lombok'
	developmentOnly 'org.springframework.boot:spring-boot-devtools'
	runtimeOnly 'com.h2database:h2'
	runtimeOnly 'io.r2dbc:r2dbc-h2'
	annotationProcessor 'org.projectlombok:lombok'

	implementation 'org.yaml:snakeyaml:1.25'
	implementation 'com.fasterxml.jackson.datatype:jackson-datatype-jsr310'

	testImplementation('org.springframework.boot:spring-boot-starter-test') {
		exclude group: 'org.junit.vintage', module: 'junit-vintage-engine'
	}
	testImplementation 'io.projectreactor:reactor-test'

	testAnnotationProcessor 'org.projectlombok:lombok'
	testCompileOnly 'org.projectlombok:lombok'
}

test {
	useJUnitPlatform()
}
Configure H2 database with R2DBC
Update application.yml with the below h2 database and R2DBC dialect configuration
# Datasource Configurations
h2:
  console:
    enabled: true
    path: /h2

# R2DBC Configuration
r2dbc:
  url: r2dbc:h2:mem:///cataloguedb  username: sa
  password:
  initialization-mode: always
Observing carefully, url starts with r2dbc rather then jdbc as we will using Reactive Streams to interact in non-blocking way with database.
Note: Spring Data R2DBC doesn’t initialize schema unlike Spring Data JPA which create tables based on the defined entities or having schema.sql and data.sql under resources.
Customizing ConnectionFactoryInitializer
Spring Data R2dbc provides ConnectionFactoryInitializer which allows us to execute sql scripts on database when it is connected.
In a Spring Boot application, database is initialized automatically during start up if schema.sql and data.sql files are in the classpath
But as per Spring Boot Github Issue, when using R2DBC, there’s no support in Spring Boot for initializing a database using schema.sql or data.sql.
And thus we have to declare a ConnectionFactoryInitializer bean to initialize the schema.sql and data.sql ourself.
Table CATALOGUE_ITEMS is defined with below table definition in resources/schema/schema.sql and a thousand insert statements are defined in resources/schema/data.sql which will be useful for testing reactive stream endpoint.
| Column | Datatype | Nullable |
|---|---|---|
| ID | INT PRIMARY KEY | No |
| SKU_NUMBER | VARCHAR(16) | No |
| ITEM_NAME | VARCHAR(255) | No |
| DESCRIPTION | VARCHAR(500) | No |
| CATEGORY | VARCHAR(255) | No |
| PRICE | DOUBLE | No |
| INVENTORY | INT | No |
| CREATED_ON | DATETIME | No |
| UPDATED_ON | DATETIME | Yes |
@Bean
public ConnectionFactoryInitializer databaseInitializer(ConnectionFactory connectionFactory) {

	ConnectionFactoryInitializer initializer = new ConnectionFactoryInitializer();
	initializer.setConnectionFactory(connectionFactory);

	CompositeDatabasePopulator populator = new CompositeDatabasePopulator();
	populator.addPopulators(new ResourceDatabasePopulator(new ClassPathResource("schema/schema.sql")));	populator.addPopulators(new ResourceDatabasePopulator(new ClassPathResource("schema/data.sql")));	initializer.setDatabasePopulator(populator);
	return initializer;
}
Spring Data R2DBC Repository
Spring Data R2DBC makes it easy to implement R2DBC based repositories.
R2DBC stands for Reactive Relational Database Connectivity, an incubator to integrate relational databases using a reactive driver.
Spring Data R2DBC applies familiar Spring abstractions and repository support for R2DBC. It makes it easier to build Spring-powered applications that use relational data access technologies in a reactive application stack.
Spring Data R2DBC allows a functional approach to interact with your database providing DatabaseClient as the entry point for applications. Below are few database drivers that are supported.
Postgres(io.r2dbc:r2dbc-postgresql)H2(io.r2dbc:r2dbc-h2)Microsoft SQL Server(io.r2dbc:r2dbc-mssql)- and many more
What to define in a Repository Interface?
Repository Interface should at minimum define the below 4 methods:
- Save a new or updated Entity
- Delete an entity,
- Find an entity by its Primary Key
- Find an entity by its title.
These operations are basically related to CRUD functions for managing an entity. Additional to these, we can further enhance the interface by defining methods to fetch data by pagination, sorting, count etc.,
Spring Data ReactiveSortingRepository includes all these capabilities and automatically create an implementation for them helping us to remove the DAO implementations entirely.
In this article, we will create CatalogueRepository which extends ReactiveSortingRepository as below
package com.toomuch2learn.reactive.crud.catalogue.repository;

import com.toomuch2learn.reactive.crud.catalogue.model.CatalogueItem;
import org.springframework.data.repository.reactive.ReactiveSortingRepository;
import reactor.core.publisher.Mono;

public interface CatalogueRepository extends ReactiveSortingRepository<CatalogueItem, Long> {
    Mono<CatalogueItem> findBySku(String sku);
}
Spring WebFlux Rest Controller
Spring WebFlux utilizes the same @Controller programming model and the same annotations used in Spring MVC.
The main difference is that the underlying core, framework contracts — i.e. HandlerMapping, HandlerAdapter, are non-blocking and operate on the reactive ServerHttpRequest and ServerHttpResponse rather than on the HttpServletRequest and HttpServletResponse.
Spring’s @RestController is annotated with @Controller and @ResponseBody. This will eliminates the need to annotate every request handling method in the controller class with the @ResponseBody annotation and ensuring every request handling method of the controller class automatically serialize the return objects into HttpResponse.
Below is part of the CatalogueController portraying the class and methods with annotations to handle Reactive Restful request to fetch Catalogue Items Stream, adding a Catalogue Item and Get Catalogue Item by SKU Number.
@Slf4j
@RestController
@RequestMapping(CatalogueControllerAPIPaths.BASE_PATH)
public class CatalogueController {

  @PostMapping(CatalogueControllerAPIPaths.CREATE)
  @ResponseStatus(value = HttpStatus.CREATED)
  public Mono<ResponseEntity> addCatalogueItem(@Valid @RequestBody CatalogueItem catalogueItem) {
    Mono<Long> id = catalogueCrudService.addCatalogItem(catalogueItem);

    return id.map(value -> ResponseEntity.status(HttpStatus.CREATED).body(new ResourceIdentity(value))).cast(ResponseEntity.class);
  }

  @GetMapping(path= CatalogueControllerAPIPaths.GET_ITEMS_STREAM, produces = MediaType.TEXT_EVENT_STREAM_VALUE)
  @ResponseStatus(value = HttpStatus.OK)
  public Flux<CatalogueItem> getCatalogueItemsStream() {      return catalogueCrudService
	  		.getCatalogueItems()
		  	.delayElements(Duration.ofMillis(200));
  }

  @GetMapping(CatalogueControllerAPIPaths.GET_ITEM)
  public Mono<CatalogueItem>      getCatalogueItemBySKU(@PathVariable(value = "sku") String skuNumber)
			throws ResourceNotFoundException {

      return catalogueCrudService.getCatalogueItem(skuNumber);
  }
}
As observed above,
- Methods are defined with return types
FluxandMono. - A
Fluxobject represents a reactive sequence of 0..N items, while aMonoobject represents a single-value-or-empty (0..1) result. - Additional Service layer is Introduced with class
CatalogueCrudServicewhich abstracts calls to data access layers from the controller class. - Handler methods are annotated with @ResponseStatus which marks a method or exception class with the status code() and reason() that should be returned.
getCatalogueItemsStreammethod is annotated with@ResponseStatusproducingMediaType.TEXT_EVENT_STREAM_VALUE. This is the API endpoint responding with stream of Catalogue Items published to the consumer with backpressure applied by sending the stream with a specific delay.- Paths are defined as static variables in
CatalogueControllerAPIPathsand are used in Controller class. This will ensure all paths are defined at one place and clearly indicate what operations are available in the controller class instead of moving around the class up and down. @Validannotation is used inaddCatalogueItemensuring the request body received is validated by Bean Validation Framework before processing the request.addCatalogueItemis defined by returning ResponseEntity instead of annotating with@ResponseStatus. When creating instance ofResponseEntitystatus of the response can be included part of it.
Below is the complete implementation of the Controller class:
package com.toomuch2learn.reactive.crud.catalogue.controller;

public class CatalogueControllerAPIPaths {

  public static final String BASE_PATH = "/api/v1";

  public static final String CREATE = "/";
  public static final String GET_ITEMS = "/";
  public static final String GET_ITEMS_STREAM = "/stream";
  public static final String GET_ITEM = "/{sku}";
  public static final String UPDATE = "/{sku}";
  public static final String DELETE = "/{sku}";
  public static final String UPLOAD_IMAGE = "/{sku}/image";

  public static final String GET_ITEMS_WS_EVENTS = BASE_PATH+"/ws/events";
}@Slf4j
@RestController
@RequestMapping(CatalogueControllerAPIPaths.BASE_PATH)
public class CatalogueController {
@Autowired
private FileStorageService fileStorageService;
@Autowired
private CatalogueCrudService catalogueCrudService;
/**
* Get Catalogue Items available in database
*
* @return catalogueItems
*/
@GetMapping(CatalogueControllerAPIPaths.GET_ITEMS)
@ResponseStatus(value = HttpStatus.OK)
public Flux<CatalogueItem> getCatalogueItems() { return catalogueCrudService.getCatalogueItems();
}
/**
* If api needs to push items as Streams to ensure Backpressure is applied, we need to set produces to MediaType.TEXT_EVENT_STREAM_VALUE
*
* MediaType.TEXT_EVENT_STREAM_VALUE is the official media type for Server Sent Events (SSE)
* MediaType.APPLICATION_STREAM_JSON_VALUE is for server to server/http client communications.
*
* https://stackoverflow.com/questions/52098863/whats-the-difference-between-text-event-stream-and-application-streamjson
* @return catalogueItems
*/
@GetMapping(path= CatalogueControllerAPIPaths.GET_ITEMS_STREAM, produces = MediaType.TEXT_EVENT_STREAM_VALUE)
@ResponseStatus(value = HttpStatus.OK)
public Flux<CatalogueItem> getCatalogueItemsStream() { return catalogueCrudService
.getCatalogueItems()
.delayElements(Duration.ofMillis(200));
}
/**
* Get Catalogue Item by SKU
* @param skuNumber
* @return catalogueItem
* @throws ResourceNotFoundException
*/
@GetMapping(CatalogueControllerAPIPaths.GET_ITEM)
public Mono<CatalogueItem> getCatalogueItemBySKU(@PathVariable(value = "sku") String skuNumber)
throws ResourceNotFoundException {
return catalogueCrudService.getCatalogueItem(skuNumber);
}
/**
* Create Catalogue Item
* @param catalogueItem
* @return id of created CatalogueItem
*/
@PostMapping(CatalogueControllerAPIPaths.CREATE)
@ResponseStatus(value = HttpStatus.CREATED)
public Mono<ResponseEntity> addCatalogueItem(@Valid @RequestBody CatalogueItem catalogueItem) {
Mono<Long> id = catalogueCrudService.addCatalogItem(catalogueItem);
return id.map(value -> ResponseEntity.status(HttpStatus.CREATED).body(new ResourceIdentity(value))).cast(ResponseEntity.class);
}
/**
* Update Catalogue Item by SKU
* @param skuNumber
* @param catalogueItem
* @throws ResourceNotFoundException
*/
@PutMapping(CatalogueControllerAPIPaths.UPDATE)
@ResponseStatus(value = HttpStatus.OK)
public void updateCatalogueItem( @PathVariable(value = "sku") String skuNumber,
@Valid @RequestBody CatalogueItem catalogueItem) throws ResourceNotFoundException {
catalogueCrudService.updateCatalogueItem(catalogueItem);
}
/**
* Delete Catalogue Item by SKU
* @param skuNumber
* @throws ResourceNotFoundException
*/
@DeleteMapping(CatalogueControllerAPIPaths.DELETE)
@ResponseStatus(value = HttpStatus.NO_CONTENT)
public void removeCatalogItem(@PathVariable(value = "sku") String skuNumber) throws ResourceNotFoundException {
Mono<CatalogueItem> catalogueItem = catalogueCrudService.getCatalogueItem(skuNumber);
catalogueItem.subscribe(
value -> {
catalogueCrudService.deleteCatalogueItem(value);
}
);
}
/**
* Upload image to the Catalogue Item by SKU
* @param skuNumber
* @param filePart
* @throws ResourceNotFoundException
* @throws FileStorageException
*/
@PostMapping(CatalogueControllerAPIPaths.UPLOAD_IMAGE)
@ResponseStatus(value = HttpStatus.CREATED)
public void uploadCatalogueItemImage( @PathVariable(value = "sku") String skuNumber,
@RequestPart("file") FilePart filePart)
throws ResourceNotFoundException {
Mono<CatalogueItem> catalogueItem = catalogueCrudService.getCatalogueItem(skuNumber);
catalogueItem.subscribe(
value -> {
fileStorageService
.storeFile(filePart)
.subscribe();
}
);
}
}Spring WebFlux Reactive Websocket
Spring WebFlux supports Websocket connection between a client and server.
A Websocket is a bi-directional, full-duplex, persistent connection between a web browser and a server. Once the connection is established, it stays open until the client or server decides to close this connection. Websockets have practical use in applications where multiple users connects with each other and send and receive messages.
Spring Framework 5 has modernized WebSockets support in the framework, adding reactive capabilities to this communication channel. Configuring WebSocket with Spring WebFlux is straight forward by defining beans WebSocketHandler and mapping with associated url.
Usecase defined here is to publish events to websocket whenever a CatalogueItem is added or updated. This will be informing the consumer to show some kind of notification or act upon the event if needed.
Spring Event Publishing capability is added to pass around CatalogueItemEvent which extends Spring’s ApplicationEvent when a Catalogue Item is added or Updated. This event will be received by the Websocket Handler and publish the event to the consumer.
Below is the complete implementation of the Websocket Handler class:
@Slf4j
@Configuration
public class CatalogueWSController {

  @Bean
  HandlerMapping handlerMapping(WebSocketHandler wsh) {    return new SimpleUrlHandlerMapping() {{
      setUrlMap(Collections.singletonMap(CatalogueControllerAPIPaths.GET_ITEMS_WS_EVENTS, wsh));
      setOrder(10);
    }};
  }

  @Bean
  WebSocketHandlerAdapter webSocketHandlerAdapter() {    return new WebSocketHandlerAdapter();
  }

  @Bean
  WebSocketHandler webSocketHandler(CatalogueItemEventPublisher eventPublisher, ObjectMapper objectMapper) {
    Flux<CatalogueItemEvent> publish = Flux.create(eventPublisher).share();

    // Push events that are captured when catalogue item is added or updated
    return session -> {
      Flux<WebSocketMessage> messageFlux = publish.map(evt -> {
          try {

            // Get source from event and set the type of event in map when pushing the message
            CatalogueItem item = (CatalogueItem) evt.getSource();
            Map<String, CatalogueItem> data = new HashMap<>();
            data.put(evt.getEventType(), item);

            return objectMapper.writeValueAsString(data);
          } catch (JsonProcessingException e) {
              throw new RuntimeException(e);
          }
        }).map(str -> {
          log.debug("Publishing message to Websocket :: " + str);
          return session.textMessage(str);
        });

        return session.send(messageFlux);
    };
  }
}
and code which publishes the event when Catalogue Item is added in CatalogueCrudService class.
@Slf4j
@Service
public class CatalogueCrudService {

	-----
	-----
	-----

	public Mono<Long> addCatalogItem(CatalogueItem catalogueItem) {
    catalogueItem.setCreatedOn(Instant.now());

    return
      catalogueRepository
        .save(catalogueItem)
        .doOnSuccess(item -> publishCatalogueItemEvent(CatalogueItemEvent.CATALOGUEITEM_CREATED, item))        .flatMap(item -> Mono.just(item.getId()));
  }

	private final void publishCatalogueItemEvent(String eventType, CatalogueItem item) {      this.publisher.publishEvent(new CatalogueItemEvent(eventType, item));  }}
Handling Exceptions
Spring’s @ControllerAdvice allows us to handle exceptions across the whole application not limiting just a single controller.
@ControllerAdvice will apply to all classes that use the @Controller or @RestController providing unified and centralized error handling logic reducing duplicate code and keep our code clean. The app can throw exception normally to indicate a failure of any kind which will then be handled separately following separation of concerns principals.
Apart of the exceptions thrown by Spring, Spring Data and Bean Validation Framework, Custom Exceptions are implemented for handling runtime exceptions.
Below are the exceptions which will be handled by the unified exception handler controller class:
- ResourceNotFoundException.class - Exception to indicate that the requested resource is not found. This exception is thrown when there is no Catalogue Item available for the requested SKU number. Below is the service class method throwing this exception when no catalogue item can be found.
public CatalogueItem getCatalogueItem( String skuNumber) throws ResourceNotFoundException {
  return getCatalogueItemBySku(skuNumber);
}

private CatalogueItem getCatalogueItemBySku(String skuNumber) throws ResourceNotFoundException {
  CatalogueItem catalogueItem = catalogueRepository.findBySku(skuNumber)
    .orElseThrow(() -> new ResourceNotFoundException(
      String.format("Catalogue Item not found for the provided SKU :: %s" , skuNumber)));

  return catalogueItem;
}- WebExchangeBindException.class - Exception to be thrown when validation on an argument annotated with `@Valid` fails or when the JSON request body is not inline to the defined `@RequestBody` class.
@PostMapping(CatalogueControllerAPIPaths.CREATE)
@ResponseStatus(value = HttpStatus.CREATED)
public ResponseEntity<ResourceIdentity> addCatalogueItem(@Valid @RequestBody CatalogueItem catalogueItem) {

  Long id = catalogueCrudService.addCatalogItem(catalogueItem);

  return new ResponseEntity<>(new ResourceIdentity(id), HttpStatus.CREATED) ;
}
Below is ExceptionHandlerController.java annotated with @ControllerAdvice for unified approach of handling the above exceptions.
@Slf4j
@ControllerAdvice
public class ExceptionHandlerController {

  @ExceptionHandler(ResourceNotFoundException.class)
  @ResponseStatus(value = HttpStatus.NOT_FOUND)
  @ResponseBody
  public Mono<ErrorResponse> onResourceFound(ResourceNotFoundException exception) {    log.error("No resource found exception occurred: {} ", exception.getMessage());

    ErrorResponse response = new ErrorResponse();
    response.getErrors().add(
      new Error(
        ErrorCodes.ERR_RESOURCE_NOT_FOUND,        "Resource not found",
        exception.getMessage()));

    return Mono.just(response);
  }

  @ExceptionHandler(WebExchangeBindException.class)
  @ResponseStatus(HttpStatus.BAD_REQUEST)
  @ResponseBody
  public Mono<ErrorResponse> onValidationException(WebExchangeBindException e) {    log.error("Validation exception occurred", e);

    ErrorResponse error = new ErrorResponse();
    for (ObjectError objectError : e.getAllErrors()) {
      error.getErrors().add(
        new Error(
          ErrorCodes.ERR_CONSTRAINT_CHECK_FAILED,          "Invalid Request",
          objectError.getDefaultMessage()));
    }
    return Mono.just(error);
  }
}
Implement tests with Spring Reactive WebTestClient
WebTestClient is Client for testing web servers that uses WebClient internally to perform requests while also providing a fluent API to verify responses.WebTestClient is similar to MockMvc. The only difference between those test web clients is that WebTestClient is aimed at testing WebFlux endpoints.
This client can connect to any server over HTTP, or to a WebFlux application via mock request and response objects.
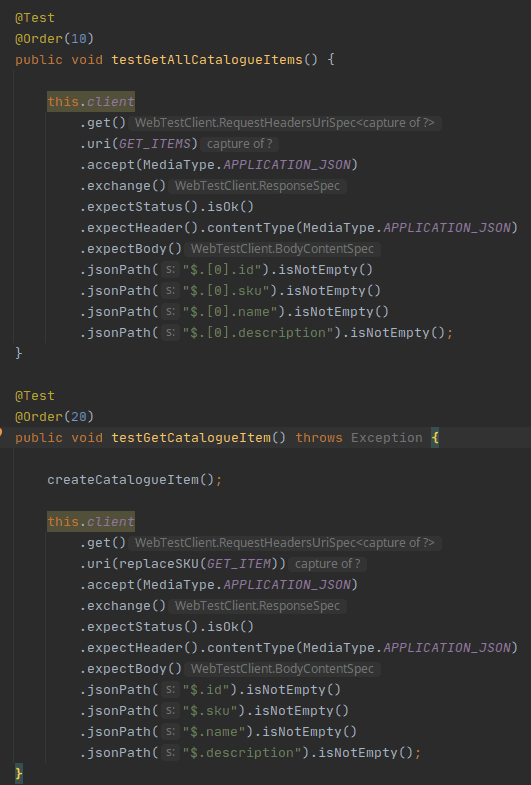
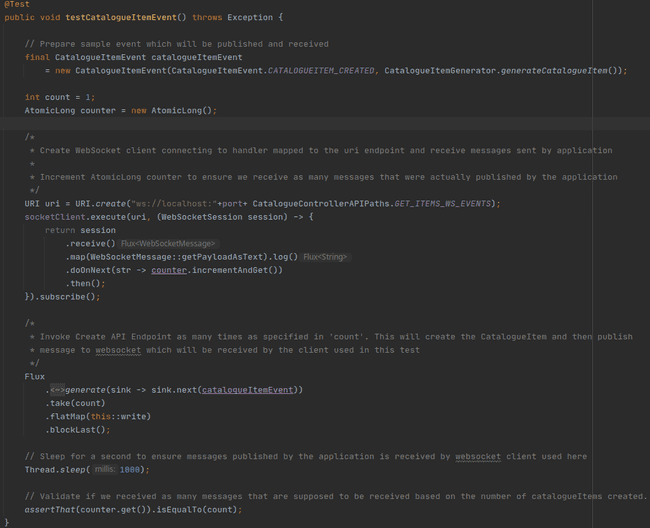
Test classes are implemented to test all RESTful endpoints registered in CatalogueController.java and the WebSocketHandler registered in CatalogueWSController.java.
Annotating the class with @SpringBootTest(webEnvironment = SpringBootTest.WebEnvironment.RANDOM_PORT) will start the application on a random port which can be injected to an instance variable by annotating with @LocalServerPort.
WebTestClient should be initiated by binding to the ApplicationContext which is loaded as part of the test execution. WebTestClient will be configured with the base url which will be used for all the endpoints that we are testing.
Test classes are annotated with @DirtiesContext(classMode = DirtiesContext.ClassMode.BEFORE_EACH_TEST_METHOD) which ensures that context is recreated before each test as we are registering H2 in-memory database which needs to be reinitialized such that tests doesn’t fail due to constraint failures.
@Slf4j
@SpringBootTest(  classes = SpringReactiveCrudCatalogueApplication.class,
  webEnvironment = SpringBootTest.WebEnvironment.RANDOM_PORT
)
@DirtiesContext(classMode = DirtiesContext.ClassMode.BEFORE_EACH_TEST_METHOD)@TestMethodOrder(MethodOrderer.OrderAnnotation.class)
public class CatalogueControllerTest {

  @LocalServerPort  int port;

  private static WebTestClient client;

  @Autowired
  public void setApplicationContext(ApplicationContext context) {
    this.client
      = WebTestClient        .bindToApplicationContext(context)        .configureClient()        .baseUrl(BASE_PATH)        .build();  }
}
Below is part of the test classes that are implemented. Refer to the Repo for complete implementation.
- CatalogueControllerTest
Of the whole, deep dive into Reactive Streams test method is needed as it uses StepVerifier which can test how Mono or Flux publishes stream to subscribes.
StepVerifier API can help us to validate the stream of elements that are sent and when the stream completes. It provides a declarative way of creating a verifiable script for an async Publisher sequence, by expressing expectations about the events that will happen upon subscription.
@Test
@Order(30)
public void testGetCatalogueItemsStream() throws Exception {

  FluxExchangeResult<CatalogueItem> result
    = this.client
      .get()
      .uri(GET_ITEMS_STREAM)
      .accept(MediaType.TEXT_EVENT_STREAM)      .exchange()
      .expectStatus().isOk()
      .returnResult(CatalogueItem.class);

  Flux<CatalogueItem> events = result.getResponseBody();
  StepVerifier    .create(events)    .expectNextMatches(catalogueItem -> catalogueItem.getId() == 1l)    .expectNextMatches(catalogueItem -> catalogueItem.getId() == 2l)    .expectNextMatches(catalogueItem -> catalogueItem.getId() == 3l)    .thenCancel()    .verify();}
As highlighted, we can validate the elements that are received in the stream by verifying with expectNextMatches.
- CatalogueWSControllerTest
Collecting Code Coverage Metrics
JaCoCo is a free code coverage library for Java which is widely used to capture the code coverage metrics during tests execution.JaCoCo can be configured with Maven & Gradle builds which generate the coverage reports. Below are the configurations that should be done:
<build>
  <plugins>
    <plugin>
      ....
      ....
    </plugin>
    <!-- Add JaCoCo plugin which is prepare agent and also generate report once test phase is completed-->
    <plugin>
      <groupId>org.jacoco</groupId>
      <artifactId>jacoco-maven-plugin</artifactId>
      <version>0.8.5</version>
      <executions>
        <execution>
          <goals>
            <goal>prepare-agent</goal>
          </goals>
        </execution>
        <execution>
          <id>report</id>
          <phase>test</phase>
          <goals>
            <goal>report</goal>
          </goals>
        </execution>
      </executions>
    </plugin>
  </plugins>
</build>plugins {
....
....
....
id 'jacoco'
}
/* Configure where the report should be generated*/
jacocoTestReport {
reports {
html.destination file("${buildDir}/jacocoHtml")
}
}For Maven, running mvn clean package will execute the tests and also generate the report. But for Gradle, we need to pass additional task along with build task to generate the report gradle clean build jacocoTestReport.
Below is the report that is generated from both Maven & Gradle and it matches irrespective of the build system used.
Note:
With Lombok used in the project, it will cause problems with coverage metrics. Jacoco can’t distinguish between Lombok’s generated code and the normal source code. As a result, the reported coverage rate drops unrealistically low.
To fix this, we need to create a file named lombok.config in project directory’s root and set the following flag as below. This adds the annotation lombok.@Generated to the relevant methods, classes and fields. Jacoco is aware of this annotation and will ignore that annotated code.
lombok.addLombokGeneratedAnnotation = trueBelow is the report generated without this configuration file added to the project. As observed, we see the coverage result drastically decreased.

Running the Spring Boot Application
There are couple of ways to run a Spring Boot Application. During development, the ideal one would be to run the main class which is annotated with SpringBootApplication i.e, CrudCatalogueApplication.java in this project. And the other ways are running through maven or gradle.
Run the application using Maven
Use the below command to run the Spring Boot application using Maven
~:\> mvn clean spring-boot:runRun the application using Gradle
Use the below command to run the Spring Boot application using Gradle
~:\> gradle clean bootRunRun the application using java -jar command
To run the application using java -jar command, we need to generate the package. Below are the maven and gradle command to generate the jar for the spring boot application.
~:\> mvn clean package

~:\> java -jar target/spring-reactive-catalogue-crud-0.0.1-SNAPSHOT.jar ~:\> gradle clean build
~:\> java -jar build/libs/spring-reactive-catalogue-crud-0.0.1-SNAPSHOT.jarAutomatic Restart and Live Reloading
Applications that use spring-boot-devtools dependency automatically restart whenever files on the classpath change. Below are the configurations to have this capability added to maven or gradle. This can be a useful feature when working in an IDE, as it gives a very fast feedback loop for code changes. By default, any entry on the classpath that points to a folder is monitored for changes.
This dependency is already included in the project when initialized using Spring Initializr. If not, add the below dependency.
<dependency>
  <groupId>org.springframework.boot</groupId>
  <artifactId>spring-boot-devtools</artifactId>
  <optional>true</optional>
</dependency>bootRun {
sourceResources sourceSets.main
}
configurations {
developmentOnly
runtimeClasspath {
extendsFrom developmentOnly
}
}
dependencies {
developmentOnly 'org.springframework.boot:spring-boot-devtools'
....
....
....
}In Eclipse, spring-boot-devtools will magically enable hot swapping of Java class changes and static file reload.
For IntelliJ IDE, additional steps are needed to enable it as below:
Enable check-box
Build project automaticallyfrom File->Setting –> Build, Execution, Deployment –> Compiler.Press SHIFT+CTRL+A for Linux/Windows users or Command+SHIFT+A for Mac users, then type registry in the opened pop-up window. Scroll down to Registry using the down arrow key and hit ENTER on Registry. In the Registry window verify the option
compiler.automake.allow.when.app.runningis checked.
Note: If you start your Spring Boot app with java -jar, the Hot Swap will not work even if we add spring-boot-devtools dependency.
Whats under the hood with Restart?
Under the hood, Spring DevTools use two classloaders - base and restart. Classes which do not change are loaded by the base classloader. Classes we are working on are loaded by restart classloader. Whenever a restart is triggered, restart classloader is discarded and recreated. This way restarting your application is much faster than usual.
Disable restart If Needed
if we need to temporary disable the restart feature, we can set spring.devtools.restart.enabled property to false in the application.properties or application.yml file in our project.
spring:
  devtools:
    restart:
      enabled: false
Disable LiveReload if needed
if we need to temporary disable the LiveReload feature, we can set spring.devtools.livereload.enabled property to false in the application.properties or application.yml file in our project.
spring:
  devtools:
    livereload:
      enabled: false
Logging changes in condition evaluation
By default, each time our application restarts, a report showing the condition evaluation delta is logged. The report shows the changes to our application’s auto-configuration as we make changes such as adding or removing beans and setting configuration properties.
To disable the logging of the report, set the following property:
spring:
  devtools:
    restart:
      log-condition-evaluation-delta: false
Excluding Resources
Certain resources do not necessarily need to trigger a restart when they are changed. For example, Thymeleaf templates can be edited in-place. By default, changing resources in /META-INF/maven, /META-INF/resources, /resources, /static, /public, or /templates does not trigger a restart but does trigger a live reload. If we want to customize these exclusions, we can use the spring.devtools.restart.exclude property.
For example, to exclude only /static and /public you would set the following property:
spring:
  devtools:
    restart:
      exclude: static/**,public/**
Building Docker Image
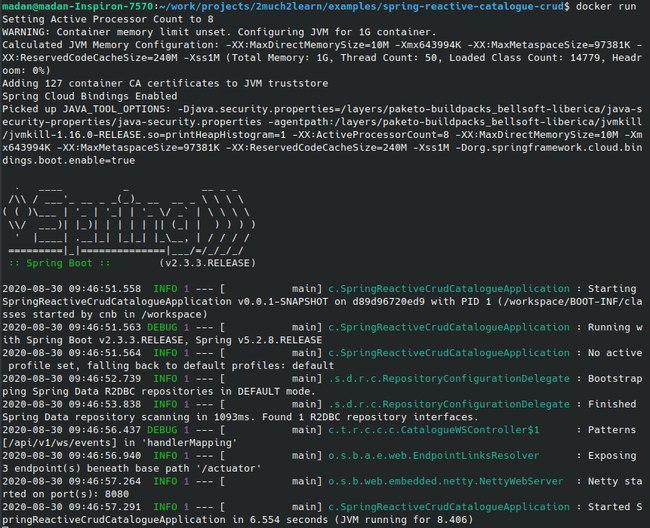
Spring Boot 2.3.0.M1 introduced simplified approach of creating docker images which uses Buildpacks under the hood.
Run the below commands to create the image with Maven or Gradle and start using the docker image.
$ mvn clean spring-boot:build-image$ gradle clean bootBuildImageThe name of the published image will be your application name and the tag will be the version.
$ docker images

spring-reactive-catalogue-crud    0.0.1-SNAPSHOT    f38b2328e745  40 years ago   268MB

$ docker run -it -p8080:8080 spring-reactive-catalogue-crud:0.0.1-SNAPSHOTFor more details, please refer to Spring Blog
Application.yml
Below is the configuration that is used in this application which includes Application information, Datasource configuration, logging etc.,
# Catalogue Management Service Spring Reactive Restful APIs
info:
  app:
    name: Catalogue Management Service
    description: Catalogue Management Service Spring Reactive Restful APIs
    version: 1.0.0

# Spring boot actuator configurations
management:
  endpoints:
    web:
      exposure:
        include: health, info, metrics

# Configure Logging
logging:
  level:
    root: INFO
    com.toomuch2learn: DEBUG
    org.springframework: INFO
    org.apache.catalina: ERROR

# Display auto-configuration report when running a Spring Boot application
#debug: true

# Configure Spring specific properties
spring:

  # Enable/Disable hot swapping
  devtools:
    restart:
      enabled: true
      log-condition-evaluation-delta: false

  # Properties for configuring jackson mapper
  jackson:
    mapper:
      # For enums, consider case insensitive when parsing to json object
      accept-case-insensitive-enums: true
    #serialization:
    #  write-dates-as-timestamps: false

  resources:
    add-mappings: false

  # Datasource Configurations
  h2:
    console:
      enabled: true
      path: /h2

  # R2DBC Configuration
  r2dbc:
    url: r2dbc:h2:mem:///cataloguedb
    username: sa
    password:
    initialization-mode: always

# Custom Configurations
file:
  upload-location: /tmp
Testing APIs via Postman
API testing tool Postman is one of the most popular tools available. The ease of Accessibility, creating environments & collections to persist test cases which validate the response status & body and Automated testing with Newman which is a command-line collection runner for Postman.
Below are the tests we execute to verify the application that is started. Ensure to add header Content-Type: application/json which is needed for most of the tests.
⭐ Download and refer to complete Postman Collection for all the below tests.
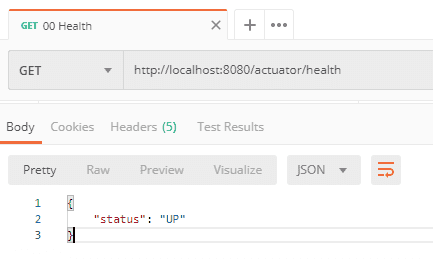
Application Health
Spring Actuator exposes /health endpoint which will expose the status of the application.
Http Method: GET - Request Url: http://localhost:8080/actuator/health
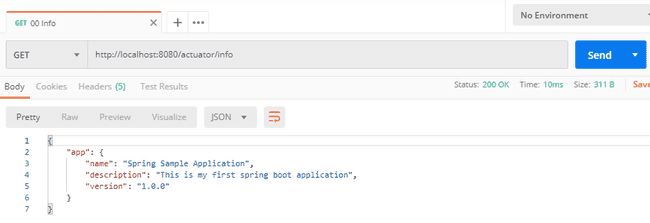
Application Information
Info section added in application.yml will be exposed by Actuator’s ‘/info’ endpoint
Http Method: GET - Request Url: http://localhost:8080/actuator/info
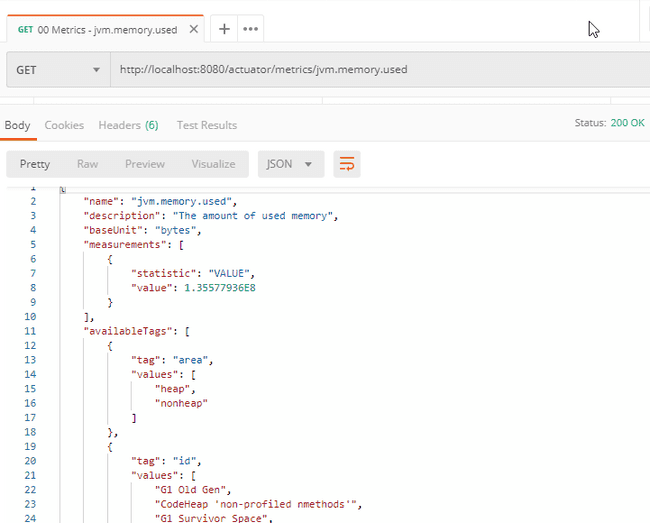
Application JVM Memory Used Metric Information
Spring Actuator exposes couple of metrics for the application. Below is the sample for fetching one such metric information
Http Method: GET - Request Url: http://localhost:8080/actuator/metrics/jvm.memory.used
Add Catalogue Item
Below are two postman requests which we will use to create Catalogue Items. One of the Catalogue item will be used to update it in the later tests.
Http Method: POST - Request Url: http://localhost:8080/api/v1/
{
	"sku": "CTLG-123-0001",
	"name": "The Avengers",
	"description": "Marvel's The Avengers Movie",
	"category": "Movies",
	"price": 0.0,
	"inventory": 0
}Get Catalogue Items
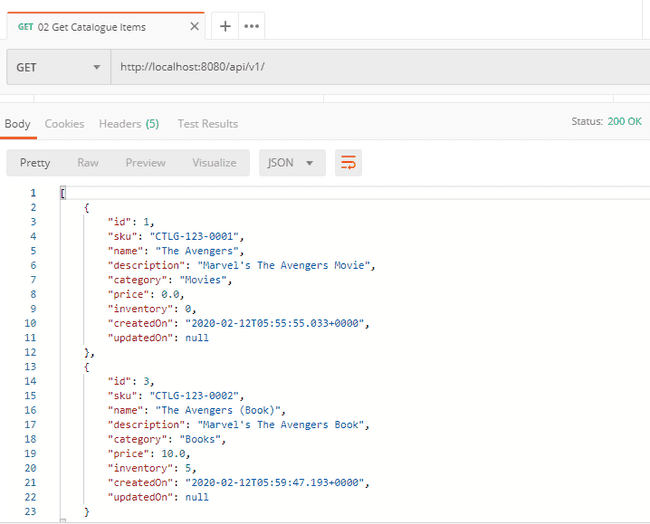
Get Catalogue Items that are persisted by the requests.
Http Method: GET - Request Url: http://localhost:8080/api/v1/
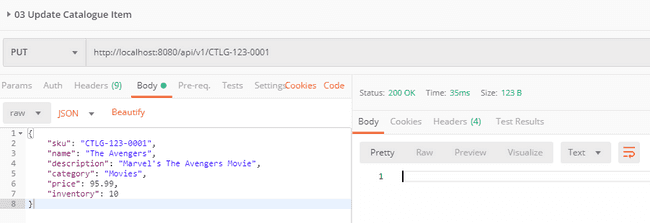
Update Catalogue Item
Update one of the Catalogue Item by its SKU number.
Http Method: PUT - Request Url: http://localhost:8080/api/v1/{sku}
{
	"sku": "CTLG-123-0001",
	"name": "The Avengers",
	"description": "Marvel's The Avengers Movie",
	"category": "Movies",
	"price": 95.99,
	"inventory": 10
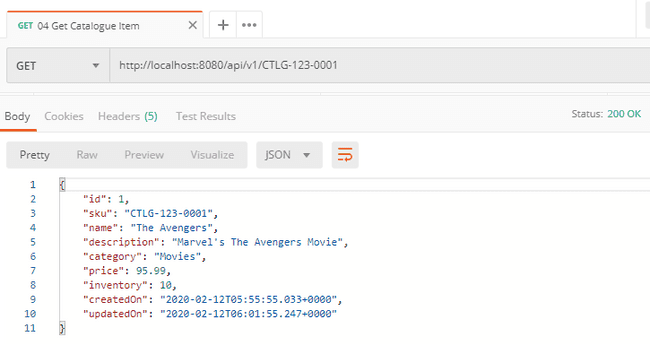
}Get Catalogue Item by SKU
Get the updated Catalogue Item by its SKU. Verify if the fields that are updated compared to the add request is reflected in thus Get Request.
Http Method: GET - Request Url: http://localhost:8080/api/v1/{sku}
Delete Catalogue Item
Delete one of the Catalogue Item persisted earlier by its SKU.
Http Method: DELETE - Request Url: http://localhost:8080/api/v1/{sku}
Upload Catalog Item Image
Upload Image for Catalogue Item as multipart file using form-data.
Http Method: POST - Request Url: http://localhost:8080/api/v1/{sku}/image
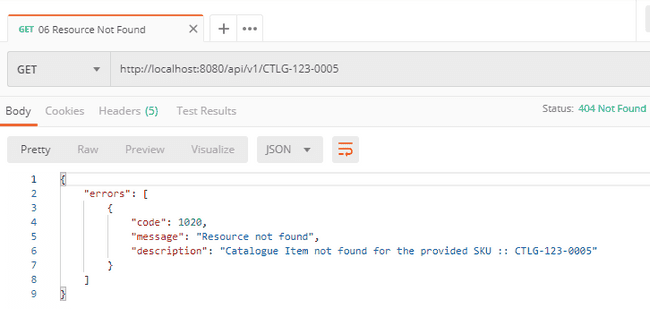
Resource Not Found
Testing Resource not found exception by passing invalid SKU.
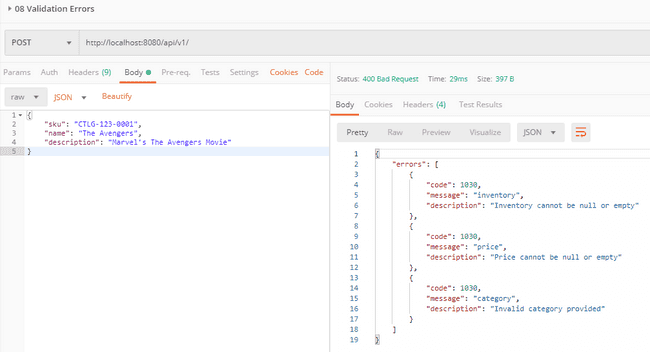
Validation Exception
Testing Validation exception by passing invalid request body.
Testing Reactive Stream Endpoint
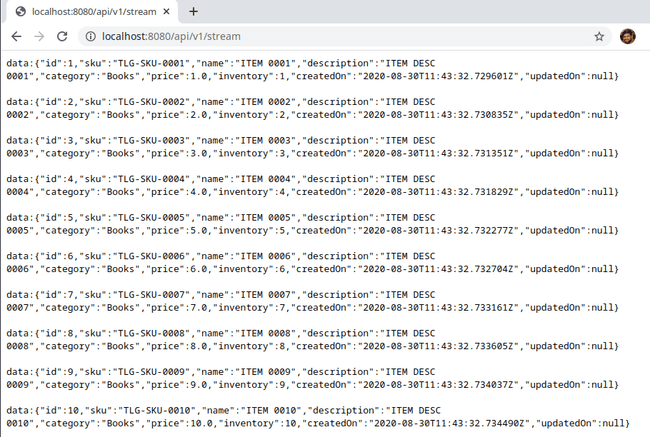
Postman doesn’t have the capability to test endpoint which sends data as streams with content-type set as text/event-stream or application/stream+json in response. If tried to access, response will be rendered only after it recivies the complete set of data published by the API.
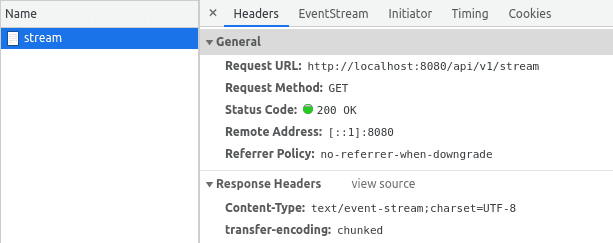
The easiest way to test is to access the URL in Google Chrome if we could. This would render the response as and when data is sent by the stream. Below is the snapshot of chrome rendering the output as individual records.
As observed, Response Header shows content-type as text/event-stream.
Testing Websocket Endpoint
Postman doesn’t have the capability to test Websocket. Rather than building a User Interface or implementing client, we can test Websockets with Firecamp, which is an alternative to Postman.
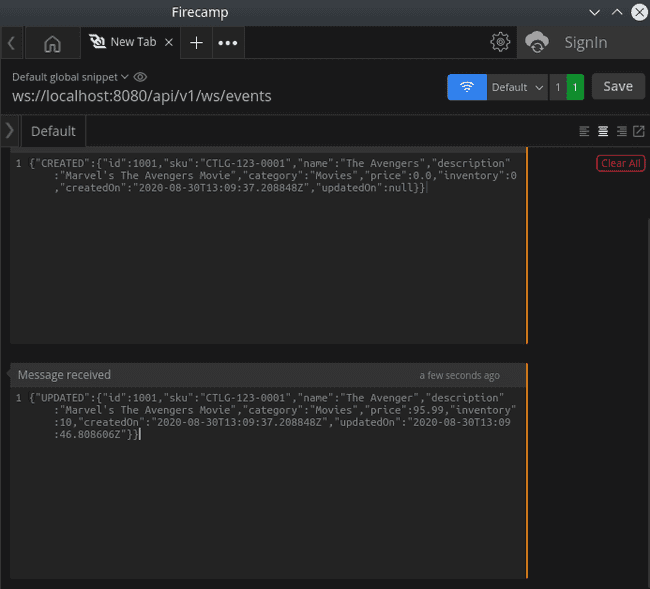
Firecamp supports testing HTTP RESTful APIs along with capabilities to test Websockets, GraphQL. Install Firecamp, create new Websocket request and click on Connect option to establish the connection to get ready to receive events as and when something is pushed to the websocket.
Below is how Create & Update events that are captured whenever a Catalogue Item is added or updated.
Gotchas
Initialize Gradle build from Maven build
Before proceeding further, ensure Gradle is setup and configured properly. Running the below command should display the version of Gradle that is configured.
~:\> gradle -v

------------------------------------------------------------
Gradle 6.6.1
------------------------------------------------------------

Build time:   2020-08-25 16:29:12 UTC
Revision:     f2d1fb54a951d8b11d25748e4711bec8d128d7e3

Kotlin:       1.3.72
Groovy:       2.5.12
Ant:          Apache Ant(TM) version 1.10.8 compiled on May 10 2020
JVM:          11.0.6 (Oracle Corporation 11.0.6+9-jvmci-20.0-b02)
OS:           Linux 5.3.0-64-generic amd64
Running command gradle init from the root of your project will check if there is maven build already available. If yes, it will prompt with the below message to generate Gradle build.
~:\> gradle init --stacktrace

Found a Maven build. Generate a Gradle build from this? (default: yes) [yes, no]
Upon proceeding, Gradle initialization fails with NullPointerException. To resolve this, remove <repositories/> and <pluginRepositories/> in pom.xml and try again. This will initialize Gradle build by successfully generating build.gradle and settings.gradle next to pom.xml.
Below changes need to be applied to generated build.gradle to get it working without any errors
- Change
httptohttpsfor the default mavenurl. - Configure Lombok Plugin which will ensure that the lombok dependency is added to compile your source code. Add the below line to the plugins section
id "io.freefair.lombok" version "5.0.0-rc2"- Add the below to build.gradle to use
jUnitPlatformfor executing the test cases.
test {
    useJUnitPlatform()
}- Add Spring Boot Gradle plugin which will create executable archives (jar files and war files) that contain all of an application’s dependencies and can then be run with
java -jar
id 'org.springframework.boot' version '2.3.3.RELEASE'- Add Spring Dependency Management plugin which will automatically import the
spring-boot-dependenciesbom and use Spring Boot version for all its dependencies. Post adding the below line to plugins, you can remove:2.3.3.RELEASEwherever it is referred in build.gradle
id 'io.spring.dependency-management' version '1.0.10.RELEASE'To generate executable jar of the application and start the spring boot application, run the below commands in order.
~:\> gradle clean build

~:\> java -jar build\libs\spring-reactive-catalogue-crud-0.0.1-SNAPSHOT.jar
Conclusion
Implementing Reactive Restful APIs using Spring Boot is like a breeze as most of the uplift is done by the framework and allowing us to focus on the business logic. With the kind of support available with Spring ecosystem, there is a tool available for us to choose based upon our need.
This article is long and extensive for sure. But this is the base for my future articles
- Porting Reactive Restful APIs to GraalVM
- Performing Load Tests using Gatling
- Deploying API Service to Kubernetes
And many more…
