Software Development Environment setup on Macbook with M2 chip
Last modified: 25 May, 2023
Introduction
Got myself a new Apple Macbook Pro M2 Max 14″ and this guide is all about setting up the development environment needed to properly configure the Apple silicon device and for future reference to reconfigure the machine again if need be.
And reference to Mac Cheat Sheets to help easeful switch from Windows to Mac !!
Prerequisites
Below are few prerequisites that should be installed prior to setting up the dev environment setup on Mac with M2 silicon chip.
Install Rosetta on your Mac
Rosetta 2 enables a Mac with Apple silicon to use apps built for a Mac with an Intel processor. Run the bellow command to install Rosetta.$ /usr/sbin/softwareupdate --install-rosetta --agree-to-licenseBrowsers
- Microsoft Edge
- Google chrome
Collobration
- Microsoft Teams
Utilities
Flycut - Clipboard manager
Flycut is a clean and simple clipboard manager for developers. It's based on an open source app called Jumpcut.Flycut can be installed from appstrore.
Boop - Developer Tool
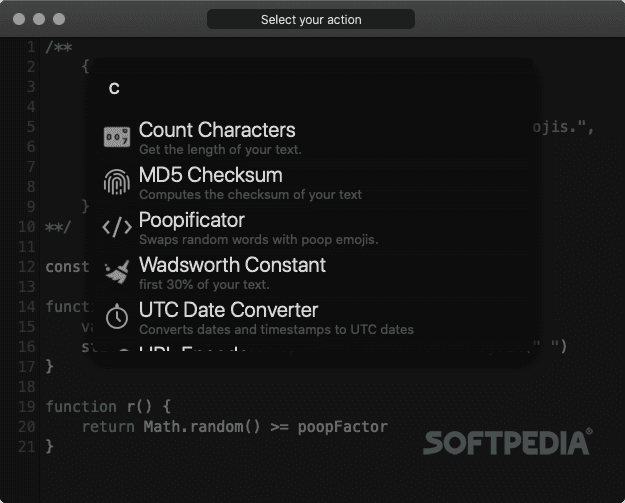
Boop is scriptable scratchpad for developers.It includes scripts as below which helps the devs to quickly action on tasks that we generally rely upon some online portals.
Few of them as below
- Format JSON
- Format YAML
- Base64 Encode
- Base64 Decode
- URL Encode
- Eval Javascript
- Remove duplicates
- and many more..
Boop can be installed from appstrore.
Tabby
Tabby terminal is an infinitely customizable cross-platform terminal app for local shells, serial, SSH and Telnet connectionsInstall latest macos package(tabby-1.0.197-macos-arm64.pkg)
To display git branch names and other stylings, install ohmyzsh
Run the below command post installing Tabby terminal, for the terminal to instantly change with default theme.
$ sh -c "$(curl -fsSL https://raw.githubusercontent.com/ohmyzsh/ohmyzsh/master/tools/install.sh)"Post installing zsh, need to do the below to load bash alises into zsh.
$ vi ~/.zshrc

Copy below at the bottom of the file

source ~/.bash_profile

:wq

$ source ~/.zshrc
Madshot
With Madshot, we can instantanly annotate or draw boxes and save to clipboard and share the image post taking a screenshot of selected region for adding to JIRA or sharing over teams.
Replacement for the inbuilt screenshot as it doesn’t have copy to clipboard after adding annotatios or drawings.
Madshot can be installed from appstrore.
IDE's
IntelliJ IDEA
Download and install IntelliJ IDEA Community Edition.
Install below plugins after launching.
- Cucumber for Java
- Markdown
VSCode
Download VSCode archive and extract the content. Move the extracted app file to applications.
Install below extensions by launching VS Code Quick Open (⌘+P)
ext install zesbenp.prettier-vscode

ext install donjayamanne.githistory

ext install johnpapa.vscode-peacock

ext install vscjava.vscode-java-pack

ext install redhat.java

ext install vscjava.vscode-java-debug

ext install vscjava.vscode-java-dependency

ext install vscjava.vscode-maven

ext install vscjava.vscode-java-test

ext install eamodio.gitlens

ext install VisualStudioExptTeam.vscodeintellicode

ext install ms-vscode-remote.remote-containers

ext install ms-azuretools.vscode-docker

ext install ms-kubernetes-tools.vscode-kubernetes-tools
Sublime Text
- Use this as replaced for Notepad++ on Windows
Applications
Docker Desktop
Post installation, navigate to settings and enable kubernetes cluster.
Run the below commands to verify if installation and configuration is successful.
$ docker -v

$ kubectl version
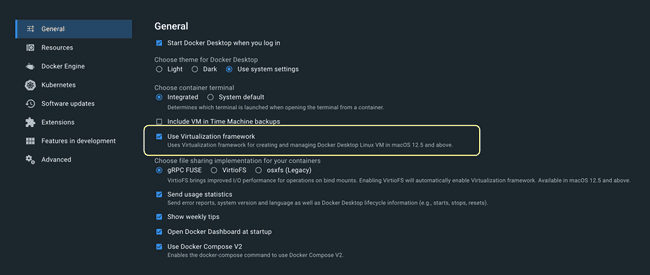
To ensure Docker container images built for Intel chip work as expected on M2, Enable the below configurations in Docker Desktop, which will enable using Rosetta on M2.
Postman
Download Postman archive and extract the content. Move the extracted app file to applications.
Binaries
Xcode Command Line Tools
Ref: Install Xcode Command Line Tools
Run below command to install xcode command line tool
$ xcode-select --installHomebrew
Execute the below in terminal
$ /bin/bash -c "$(curl -fsSL https://raw.githubusercontent.com/Homebrew/install/HEAD/install.sh)"Run the below to add homebrew to path
$ (echo; echo 'eval "$(/opt/homebrew/bin/brew shellenv)"') >> /Users/madan/.zprofile
    eval "$(/opt/homebrew/bin/brew shellenv)"
Run the below to verify if brew is installed successfully and available in the path for subsequent commands
$ brew search javaCurl
$ brew install curl

$ curl --help
SDKMAN
$ curl -s "https://get.sdkman.io" | bash

$ source "$HOME/.sdkman/bin/sdkman-init.sh"

$ sdk version

$ sdk list
Java
Elcipse Temurin Distro
Install latest version of OpenJDK distribution from Eclipse Temurin.
$ java --versionTo uninstall, run the below command
$ rm -rf /Library/Java/JavaVirtualMachines/temurin-17.jdk
Using SDKMAN
Identify and choose the version of Java that you wish to install
$ sdk list java

$ sdk install java 8.0.372-zulu

$ java -version
Install another version of Java. Post installation, prompt would appear to choose this version as default. Opt in accordingly.
$ sdk install java 11.0.19-zuluTo switch between versions of Java, use the below commands
# See which versions are installed
$ sdk list java

$ sdk use java 11.0.19-zulu
To set a permanent default, use the sdk default command. For instance, to make JDK 11 the default, type:
$ sdk default java 11.0.0-openMaven
$ brew install maven

$ mvn -v
Gradle
$ brew install gradle

$ mvn -v
Git
$ brew install git

$ git -v
mitmweb
mitmproxy is a free and open source interactive HTTPS proxy.$ brew install mitmproxyNode
Install latest version of Node
$ brew install node

$ node -v

$ npm -v

$ npm install -g yarn

$ yarn -v
Install older version of Node
$ brew install node@16Switch between node versions
$ brew unlink node

$ brew link node@16

$ echo 'export PATH="/usr/local/opt/node@16/bin:$PATH"' >> ~/.bash_profile
or
$ echo 'export PATH="/opt/homebrew/opt/node@16/bin:$PATH"' >> ~/.zshrc

$ source ~/.bash_profile
or
$ source ~/.zshrc

$ node -v
Mockoon
Mockoon is the easiest and quickest way to design and run mock REST APIsbrew install --cask mockoonMeld
Meld is Visual diff and merge tool, which helps you compare files, directories, and version controlled projects. It provides two- and three-way comparison of both files and directories, and has support for many popular version control systems
brew install --cask meldmeld is not verified for malwere and will restrict opening the app. Select option to open meld anyway from System Settings -> privacy & Secuirty
MacOS Customizations
Choose Open with VSCode for selected folder from finder
https://stackoverflow.com/questions/64040393/open-a-folder-in-vscode-through-finder-in-macos
Change default command actions by setting aliases
Modify default behaviour of the command by passing additional options and setting the alias.
Run vi ~/.bash_profile and add the below as needed
ls
Change behaviour of ls by passing -a to show list of all files by default - https://wpbeaches.com/make-an-alias-in-bash-or-zsh-shell-in-macos-with-terminal/
alias ls='ls -lah'To apply the changes in the current terminal, run source ~/.bash_profile
watch
Watch will run a command repeatedly which can turn any command line program output into a “real time” display.
Run below to install watch command
$ brew install watchAdditional tools and configurations
Mongodb
Run the below command to install and access mongodb community edition
$ brew tap mongodb/brew

$ brew update

$ brew install mongodb-community@6.0
Below binaries are included as part of the installation:
mongodmongosmongoshmongotopmongoimportmongodump
Installation create following files and directories:
- configuration file -
/opt/homebrew/etc/mongod.conf - log directory -
/opt/homebrew/var/log/mongodb - data directory -
/opt/homebrew/var/mongodb
Run below commands to start and stop the servce:
$ brew services start mongodb-community@6.0

$ brew services list

$ brew services stop mongodb-community@6.0
For mongod process to run as a background service, run the below command.
$ mongod --config /opt/homebrew/etc/mongod.conf --fork

# To see if MongoDB is running as background process
$ ps aux | grep -v grep | grep mongod
To stop a mongod running as a background process, connect to the mongod using mongosh, and issue the shutdown command as needed.
To connect to MongoDB, run command mongosh.
To set credentials, run the below post connecting to mongosh
> use admin

> db.createUser(
  {
    user: "root",
    pwd: "Test@123",
    roles: [ { role: "userAdminAnyDatabase", db: "admin" } ]
  }
)
Download and install MongoDB Compass to access the database using GUI. Choose Platform as macOS arm64 (M1).
Start accessing mongodb from compass with connection string - mongodb://localhost:27017 and if needed use autetication with user credentials configured above.
Kubeshark
Kubeshark is the API Traffic Analyzer for Kubernetes.Ensure Kubernetes is installed and configured to try out kubeshark.
Run the below commands to install kubeshark
$ brew tap kubeshark/kubeshark

$ brew install kubeshark

$ kubeshark version
Run below command to start kubeshark and to showup the access url for kubeshark
$ kubeshark tap --proxy-host 0.0.0.0Run below command to clean all relics of Kubeshark from your cluster when using the CLI
$ kubeshark clean