Service Registration and Discovery in Spring Boot Microservices with Spring Cloud Consul
Last modified: 04 Jan, 2021
Introduction
In this article, we shall dig into steps on how to enable Service Registration and Discovery in Spring Boot microservices with Spring Cloud Consul.
Let’s understand the below Problem Statement before we proceed further.
With current infrastructure capabilities, services can be scaled up manually or automatically which makes them deployed to different dynamic locations (host & port). Configuring access to these services within application’s static configuration files cannot be a viable option. We cannot modify and deploy the consuming application with the locations to these dynamically scaled services.
Service Registration and Discovery pattern comes to the rescue to overcome this problem statement. Service Registration and Discovery, is a mechanism which enables microservices to consume other microservices without needing to know the exact access url.
Enabling this capability within applications along side with applicable products & libraries, developers can focus more on the business logic to get things done and never worry about configuring access details to downstream services whenever they are scaled up/down.
Usecase
We shall look into implementing a simple usecase which can help us understand the configuration needed around registering the services and have them discovered for seamless integration.
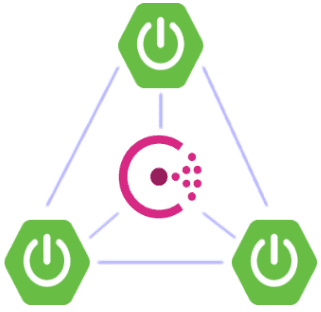
Below is the use case we shall go through in this article. This includes three Spring Boot application exposing RESTFul endpoint and one of them being the root application and the other two being downstream applications. All the three services will be registered & discovered with Consul by using Spring Cloud Consul
Rather than providing detailed explanation on the underlying concepts around Spring Boot (YAML configuration, Spring Profiles, Docker, Kubernetes), We shall only focus on configurations and commands to execute to have the three applications built and deployed successfully.
Technology stack for implementing the Restful APIs
- Redhat OpenJDK 11
- Spring Boot v2.4.1
- Maven v3.6.3
- Gradle v6.1.1
- Docker Desktop for Windows
- HashiCorp Consul
HashiCorp Consul
Consul is a distributed, highly available, datacenter-aware, service discovery and configuration system.Keeping inline to this article, Consul provides the below capabilities:
- Services to discover each other by storing location information (like IP addresses) in a single registry.
- Improve application resiliency by using Consul health checks to track the health of deployed services.
Consul provides a clean Web UI, which gives a simplified view on the registered services and their instances. It also perform periodic health checks and shows the appropriate status of the service & instance availability.
Consul Web UI is accessible on port 8500 by default.
Spring Cloud Consul
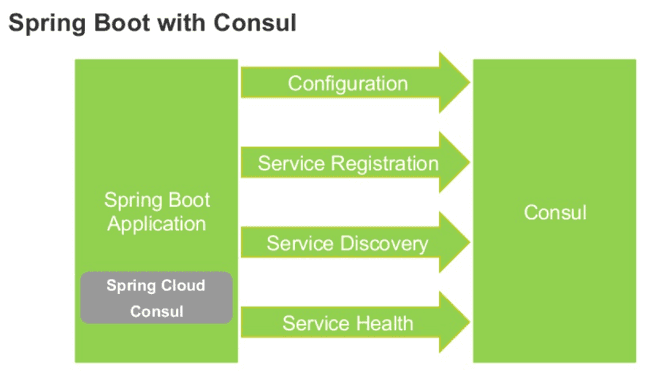
Spring Cloud Consul provides Consul integrations for Spring Boot apps through auto configuration and binding to the Spring Environment and other Spring programming model idioms. With a few simple annotations we can quickly enable and configure the common patterns inside our application and build large distributed systems with Hashicorp’s Consul.Configuring Spring Cloud Starter Consul All dependency in Spring Boot project shall provide access to the below capabilities:
- Service Registration & Discovery - instances can be registered with the Consul agent and clients can discover the instances using Spring-managed beans.
- Distributed Configuration - using the Consul Key/Value store.
- Control Bus - Distributed control events using Consul Events.
To keep inline to this article, we can add either spring-cloud-starter-consul-all or spring-cloud-starter-consul-discovery dependency.
spring-cloud-starter-consul-discovery includes the below dependencies which helps in leveraging the capabilities around Service Registration & Discovery.
spring-cloud-starter-netflix-ribbon- Ribbon for client side load-balancer via Spring Cloud Netflixspring-cloud-starter-loadbalancer- A client side load-balancer provided by the Spring Cloud projectspring-cloud-starter-netflix-zuul- Zuul, a dynamic router and filter via Spring Cloud Netflixspring-cloud-netflix-hystrix- Hystrix for Circuit Breaker resiliency capabilities.
Bootstrapping Project with Multi Module Spring Boot Application
Instead of bootstrapping the codebase for this usecase from scratch, we shall try to extend the codebase from my previous article.
Clone the source code of the article Containerizing Maven/Gradle based Multi Module Spring Boot Microservices using Docker & Kubernetes from here.
Key changes to existing codebase
Below configuration changes are needed on existing codebase for leveraging the capabilities for Service Registration & Discovery with Consul.
Configure Maven/Gradle
Existing codebase is a multi-module project supporting both Maven and Gradle.
To distinguish artifacts from existing codebase, we shall rename the root project artifact from spring-multi-module-service to spring-multi-module-consul.
Add the below dependencies to root project pom.xml & build.gradle for enabling healthcheck endpoint and spring-cloud-consul capabilities.
Maven
<project....>

  <groupId>com.toomuch2learn.microservices</groupId>
	<artifactId>spring-multi-module-consul</artifactId>	<version>0.0.1-SNAPSHOT</version>
	<name>spring-multi-module-consul</name>	<description>Spring multi module consul service</description>

  <dependencies>
    ...
    ...
    <dependency>
      <groupId>org.springframework.boot</groupId>
      <artifactId>spring-boot-starter-actuator</artifactId>    </dependency>

    <dependency>
      <groupId>org.springframework.cloud</groupId>
      <artifactId>spring-cloud-starter-consul-all</artifactId>    </dependency>
  </dependencies>
</project>
Gradle
rootProject.name = 'spring-multi-module-consul'
include 'service-a'
include 'service-b'
include 'service-c'....
....
subprojects {
....
....
dependencies {
implementation 'org.springframework.boot:spring-boot-starter-actuator' implementation 'org.springframework.boot:spring-cloud-starter-consul-all' ....
....
}
}
....
....Annotating SpringBootApplication Class
We need to annotate our SpringBoot main class with @EnableDiscoveryClient alongside with @SpringBootApplication.
@EnableDiscoveryClient annotation is part of Spring Cloud Commons project which looks for implementations of the DiscoveryClient available on the classpath.
Adding @EnableDiscoveryClient annotation is no longer required as the appropriate implementation is identified by the one available in classpath. But adding this will make us aware on the capabilities that are configured in our Spring Boot application in a glance.
package com.toomuch2learn.microservices.servicea;

import org.springframework.boot.SpringApplication;
import org.springframework.boot.autoconfigure.SpringBootApplication;
import org.springframework.cloud.client.discovery.EnableDiscoveryClient;import org.springframework.cloud.openfeign.EnableFeignClients;

@SpringBootApplication
@EnableDiscoveryClient@EnableFeignClients
public class ServiceAApplication {

	public static void main(String[] args) {
		SpringApplication.run(ServiceAApplication.class, args);
	}

}
Configuring Application properties
Application configurations are maintained in application.yaml with multiple profiles available for us to choose the right profile based on the environment the application is deployed to.
Below is the application configuration for Service A, which is configured with service-b & service-c url and spring.cloud.consul properties.
spring:
  application:
    name: service-a
  profiles:
    active: "dev"
  cloud:    consul:      host: 127.0.0.1      discovery:                instanceId: "${spring.application.name}-${server.port}-${spring.cloud.client.ip-address}"        prefer-ip-address: true        health-check-critical-timeout: "1m"
server:  port : 8080
serviceb:  url: http://service-b
servicec:  url: http://service-c
---

spring:
  profiles: dev

server:
  port : 8081

---

spring:
  profiles: prod
Below are few points to note:
- The default port configured for the spring boot application is
8080but is overridden to8081fordevprofile. spring.cloud.consulproperties are configured at global level to remain the same for bothdev&prodprofile.spring.cloud.consul.hostproperty is pointing to127.0.0.1and port to8500by default. This can be overridden by passing the property as environment variable based on how the services are provisioned & deployed.serviceb.url&servicec.urlis configured with Service B & Service Cspring.application.name. These properties will be expanded during runtime and leveraged by differentSpring Cloudcapabilities - Service Discovery, Load Balancing & Circuit Breaker.
Application properties remain the same for Service B & Service C apart from spring.application.name and server.port
spring:
  application:
    name: service-b
  profiles:
    active: "dev"
  cloud:    consul:      discovery:        instanceId: "${spring.application.name}-${server.port}-${spring.cloud.client.ip-address}"        prefer-ip-address: true        health-check-critical-timeout: "1m"server:
  port : 8080

---

spring:
  profiles: dev

server:
  port : 8082

---

spring:
  profiles: prod
Below are few Spring Cloud Consul configuration properties that we configured above. Refer to the documentation for the complete list of available configuration properties.
| Name | Default | Description |
|---|---|---|
| spring.cloud.consul.host | localhost | Consul agent hostname. Defaults to ‘localhost’. |
| spring.cloud.consul.discovery.instanceId | Unique Id that identifies the instance in Consul UI. | |
| spring.cloud.consul.discovery.prefer-ip-address | false | Use ip address rather than hostname during registration. |
| spring.cloud.consul.discovery.health-check-critical-timeout | Timeout to deregister services critical for longer than timeout (e.g. 30m). |
Building Docker Images
Run below commands from the root project to build multi-module project artifacts and create docker images for individual modules.
$ mvn clean package spring-boot:build-image$ gradle clean build bootBuildImageExecuting docker images | grep spring-multi-module-consul should list the below three docker images.

Pushing docker images to Docker Hub
Follow the below steps to tag the images and push them to Docker Hub.
$ docker login$ docker tab <IMAGE_ID> <Docker_Username>/<IMAGE_NAME>
$ docker tag ffc5ec760103 $DOCKER_USER_NAME$/springboot-servicea$ docker push <Docker_Username>/<IMAGE_NAME>
$ docker push $DOCKER_USER_NAME$/spring-multi-module-service-service-aBootstrapping Consul Server
Consul is a complex system that has many different moving parts which constitutes Data Centers, Servers & Agents participating in a gossip protocol.
Consul provides native installation procedure to install the server on host directly. But the easiest way to try out consul is to work with Consul Docker Image.
Run the below docker run command to kick start Consul server.
$ docker run -d --name consul-server -p 8500:8500 -e CONSUL_BIND_INTERFACE=eth0 consul$ $ docker logs consul-server
==> Found address '172.17.0.2' for interface 'eth0', setting bind option...
==> Starting Consul agent...
Version: '1.9.1'
Node ID: '597f4fef-fdcb-734a-37f1-14faefab6615'
Node name: '962e56017069'
Datacenter: 'dc1' (Segment: '<all>')
Server: true (Bootstrap: false)
Client Addr: [0.0.0.0] (HTTP: 8500, HTTPS: -1, gRPC: 8502, DNS: 8600)
Cluster Addr: 172.17.0.2 (LAN: 8301, WAN: 8302)
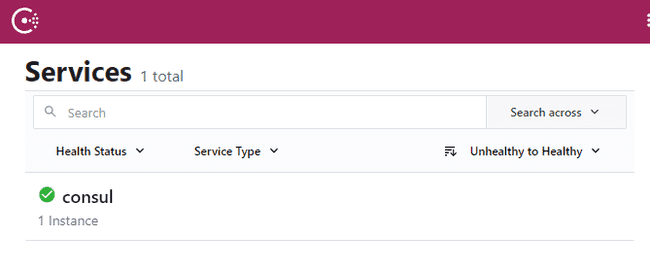
Encrypt: Gossip: false, TLS-Outgoing: false, TLS-Incoming: false, Auto-Encrypt-TLS: falseAccess http://127.0.0.1:8500 to open up Consul UI. Observe there is only one service registered which is the consul server itself.
Run the below commands to start Spring Boot services and observe they are registered and displayed in Consul UI successfully.
Start the services by running the individual fat jars. This will use dev profile as configured in application.yaml
$ mvn clean package

$ java -jar service-a\target\service-a-0.0.1-SNAPSHOT.jar
$ java -jar service-b\target\service-b-0.0.1-SNAPSHOT.jar
$ java -jar service-c\target\service-c-0.0.1-SNAPSHOT.jar
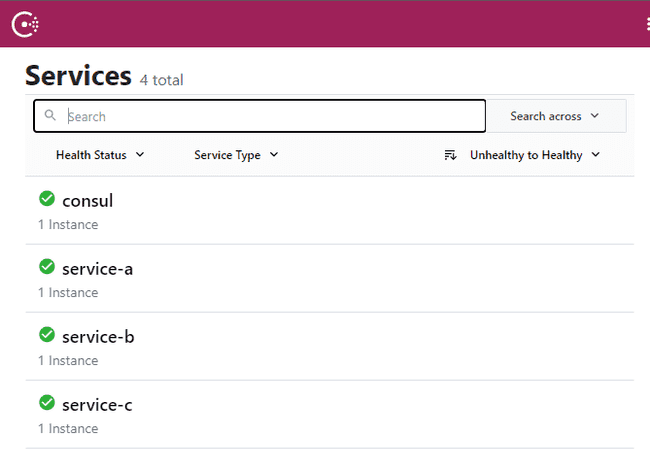
Access Consul UI after a minute to observe three new services registered as below.
Access Service A greeting endpoint to see if API is working as expected by accessing downstream Service B and Service C APIs.
Service Discovery should working seamlessly by itself as we haven’t configured downstream APIs access urls.
$ curl http://localhost:8081/greeting

{"id":1,"content":"Service-A - Hello, World! - Service-B - Hello, World! - 1 - Service-C - Hello, World! - 1"}
Deploying with Docker Compose
Instead of running docker images individually, the complete stack with Consul server can be brought up / down with docker-compose.
Below is docker-compose.yaml with Consul and all the spring-boot services configured individually.
Keep an eye on the below specifics:
consul-serveris linked to allspring-bootservices.- Additional instances for
service-b&service-care configured to verify howLoad Balancingworks all by itself without any specific configuration needed fromservice-ato access these downstream APIs.
version: '3.9'

# Define services
services:

  # Service A
  consul-server:    image: consul    ports:      - 8500:8500    restart: always    environment:      - "CONSUL_BIND_INTERFACE=eth0"    networks:      - backend
  # Service A
  service-a:
    image: $DOCKER_USER_NAME$/spring-multi-module-consul-service-a
    restart: always
    ports:
      - 8080:8080
    links:      - consul-server    environment:      - spring.profiles.active=prod      - spring.cloud.consul.host=consul-server    networks:
      - backend

  # Service B - 1
  service-b-1:    image: $DOCKER_USER_NAME$/spring-multi-module-consul-service-b
    restart: always
    links:
      - consul-server
    environment:
      - spring.profiles.active=prod
      - spring.cloud.consul.host=consul-server
    networks:
      - backend

  # Service B - 2
  service-b-2:    image: $DOCKER_USER_NAME$/spring-multi-module-consul-service-b
    restart: always
    links:
      - consul-server
    environment:
      - spring.profiles.active=prod
      - spring.cloud.consul.host=consul-server
    networks:
      - backend

  # Service C - 1
  service-c-1:    image: $DOCKER_USER_NAME$/spring-multi-module-consul-service-c
    restart: always
    links:
      - consul-server
    environment:
      - spring.profiles.active=prod
      - spring.cloud.consul.host=consul-server
    networks:
      - backend

  # Service C - 2
  service-c-2:    image: $DOCKER_USER_NAME$/spring-multi-module-consul-service-c
    restart: always
    links:
      - consul-server
    environment:
      - spring.profiles.active=prod
      - spring.cloud.consul.host=consul-server
    networks:
      - backend

# Networks to be created to facilitate communication between containers
networks:
  backend:
Run the below docker-compose commands to get the stack up, stop, start, down appropriately.
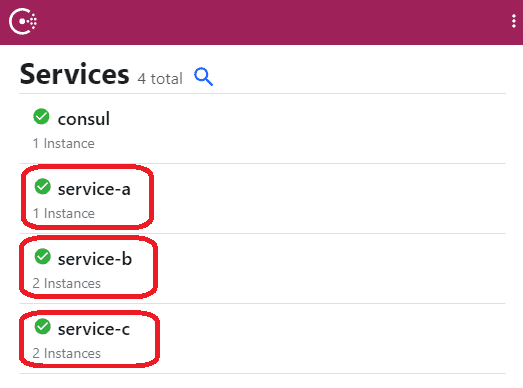
$ docker-compose config$ docker-compose up -d$ docker-compose psAccess Consul UI after a minute to observe three services registered and 2 instances for service-a and service-b as below.
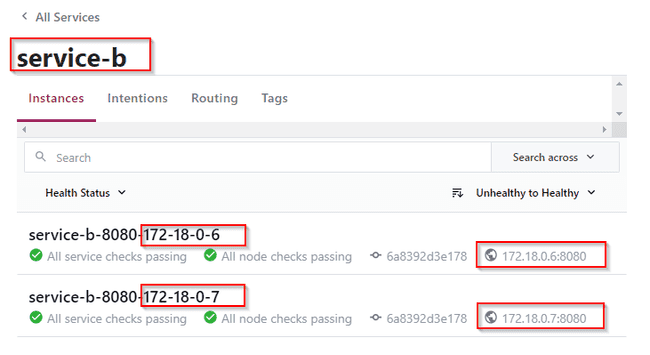
Access Service A greeting endpoint multiple times to see downstream APIs are accessed via round-robin fashion with internal load balancer.
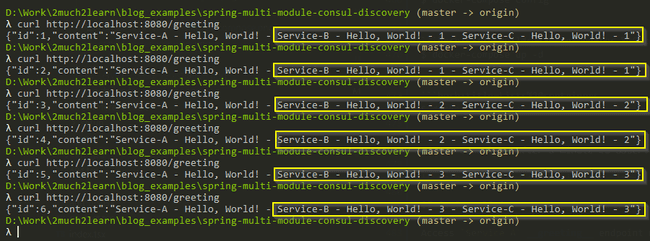
Proceed to stop the services or bring down the provisioned stack by running below commands.
$ docker-compose stop$ docker-compose start$ docker-compose downDeploying with Kubernetes
Docker Desktop is the easiest way to run Kubernetes on your windows machine. It gives ua a fully certified Kubernetes cluster and manages all the components for us.
Install Docker Desktop and ensure to enable kubernetes from settings window.
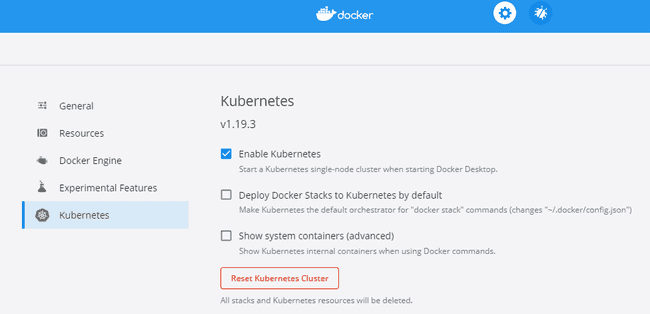
Execute $ kubectl cluster-info to verify if Kubernetes cluster is running successfully. If not, uninstall and install Docker Desktop and ensure you receive the below message as expected to proceed with kubernetes deployment.
$  kubectl cluster-info

Kubernetes master is running at https://kubernetes.docker.internal:6443
KubeDNS is running at https://kubernetes.docker.internal:6443/api/v1/namespaces/kube-system/services/kube-dns:dns/proxy
To deploy docker images to kubernetes, we need to configure Deployment and Service objects and have them applied to orchestrate the deployment into kubernetes cluster.
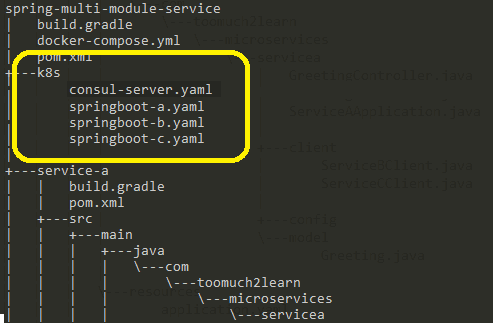
Deployment configuration files are created for services in individual yaml file under k8s folder.
Below is the sample deployment & service configuration for Consul to deploy to kubernetes. Service type is configured as NodePort, such that it is available to access Consul UI using the host address on configured port i.e 32500.
apiVersion: apps/v1
kind: Deployment
metadata:
  name: consul-server
spec:
  replicas: 1
  selector:
    matchLabels:
      app: consul-server
  template:
    metadata:
      labels:
        app: consul-server
    spec:
      containers:
        - name: consul-server
          image: consul
          ports:
            - containerPort: 8500
          imagePullPolicy: Always
          env:
            - name: CONSUL_BIND_INTERFACE
              value: "eth0"
---
apiVersion: v1
kind: Service
metadata:
  name: consul-server-svc
spec:
  selector:
    app: consul-server
  ports:
    - port: 8500
      targetPort: 8500
      nodePort: 32500
  type: NodePort
Below is the sample deployment & service configuration for Service A to deploy to kubernetes.
apiVersion: apps/v1
kind: Deployment
metadata:
  name: springboot-service-a
spec:
  replicas: 1
  selector:
    matchLabels:
      app: springboot-service-a
  template:
    metadata:
      labels:
        app: springboot-service-a
    spec:
      containers:
        - name: app
          image: $DOCKER_USER_NAME$/spring-multi-module-consul-service-a
          ports:
            - containerPort: 8080
          imagePullPolicy: Always
          env:
            - name: spring.profiles.active              value: "prod"            - name: spring.cloud.consul.host              value: "$(CONSUL_SERVER_SVC_SERVICE_HOST)"---
apiVersion: v1
kind: Service
metadata:
  name: springboot-service-a-svc
spec:
  selector:
    app: springboot-service-a
  ports:
    - port: 8080
      targetPort: 8080
  type: LoadBalancer
As observed, Service A deployment is configured with environment variables to set spring.profiles.active to prod.
We need to pass spring.cloud.consul.host as consul will be not be accessible via localhost or 127.0.0.1. For this to work, we need to configure the environment variable that are created when services are created. One of them is CONSUL_SERVER_SVC_SERVICE_HOST.
Passing $(CONSUL_SERVER_SVC_SERVICE_HOST) will expand the environment variable with host of Consul.
Run the below kubectl commands to deploy or delete the stack.
$ kubectl apply -f k8s$ kubectl get all$ kubectl get pods --watch
$ kubectl get pods -l app=springboot-service-a --watch$ kubectl exec <POD_NAME> -- printenv | grep SERVICE$ kubectl logs <POD_NAME>
$ kubectl logs -f <POD_NAME>Access Consul UI using http://localhost:32500 after a minute to observe three services registered along side with consul service.
Run the below command to scale up Service B and Service C. Access Consul UI and observe if the no of instances for Service B & Service C are displayed as 3 instead of 1.
$ kubectl scale --replicas=3 deployment/springboot-service-b

$ kubectl scale --replicas=3 deployment/springboot-service-c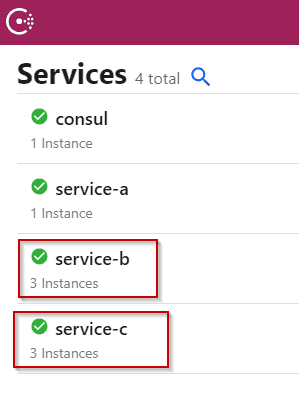
Access Service A greeting endpoint by invoking the request to service running on port 8080 to see if API is working as expected by successfully accessing downstream APIs.
$ curl http://localhost:8080/greeting

{"id":1,"content":"Service-A - Hello, World! - Service-B - Hello, World! - 1 - Service-C - Hello, World! - 1"}
Bring down the stack after testing the services.
$ kubectl delete -f k8sWhy do we need Consul on Kubernetes ?
For the purpose of this article, we are successful with provisioning Consul and leveraging the concepts of Service Registration and Discovery on Kubernetes.
But, Kubernetes already has built in support for Service Discovery pattern. So why do we need Consul on Kubernetes ?
This could be for multiple reasons which needs better understanding on what can/cannot be achieved with kubernetes. Dig into this answer on Quora which lists the possible cases why Consul might be needed compared to the default capabilities provided by Kubernetes.
Conclusion
This article is an extension to my previous article on implementing usecases to try out different microservice concepts and patterns.
This article is useful for usecase which needs all the services registered and integrated with Consul. With the support of configuring multiple modules with Maven and Gradle, it is easy for one to build all the modules with single command and have the stack deployed seamlessly to docker-compose and kubernetes.
We just digged into Service Discovery capability under spring-cloud-consul. This article shall be the base for trying out microservice pattern - Centralized Configuration with spring-cloud-consul.
Apart from the above, spring-cloud provides lot other capabilities and this article codebase will be extended to try out some of the below.
- Distributed Tracing
- Fault Tolerance
- API Gateway
- And many more…
