Setting up PostgreSQL with Docker
Last modified: 10 Mar, 2020
Introduction
As part of any application development, we definitely need a database. There might be different use cases which need different databases. Having them all installed on our machine might not be an ideal scenario. In the world of containers, this would ease us to provision the choice of database easily for testing purpose without actually installing them.
In this article we shall provision PostgreSQL docker container and go through steps on using it.
Why use PostgreSQL?
PostgreSQL is a powerful, open source object-relational database system that uses and extends the SQL language combined with many features that safely store and scale the most complicated data workloads.
A fundamental characteristic of an object-relational database is support for user-defined objects and their behaviours including data types, functions, operators, domains and indexes. This makes PostgreSQL extremely flexible and robust. Among other things, complex data structures can be created, stored and retrieved.
PostgreSQL comes with many features aimed to help developers build applications, administrators to protect data integrity and build fault-tolerant environments, and help you manage your data no matter how big or small the dataset. In addition to being free and open source, PostgreSQL is highly extensible. For example, you can define your own data types, build out custom functions, even write code from different programming languages without recompiling your database.
What are we going to do?
In this article, we shall go through how we can use Docker to explore PostgreSQL. We shall run series of commands with Docker that is installed on Windows 10. Below are series of things we will be doing:
- Create database
- Connecting to the database from container shell
- Connecting to the database from SQL Client
- Import Schema & Data when provisioning new database
- Stopping and Starting container
- Perform database operations
Prerequisites
Having Docker installed on your machine is necessary to try out provisioning PostgreSQL container.
Install Docker on Windows 10 Home Edition
As Docker Desktop does not support Windows 10 Home Edition, we need to install Docker Toolbox for Windows. Follow the detailed steps provided here to get docker toolbox installed and configured.
If everything is installed and configured as suggested, running the below command should list the version of docker.
~:\> docker -v

Docker version 19.03.1, build 74b1e89e8a
Configure Port Forwarding Rule on the default VirtualBox image
If we need to connect to the provisioned database from SQL client installed on Windows 10, we need to configure port forwarding for the default VirtualBox image that is created as part of the Docker setup on Windows 10 Home Edition. Follow the steps to configure port forwarding for ssh & port 5432 as below:
Right Click on the default image and choose
SettingsChoose
Network>Adapter1> expandAdvanced> clickPort ForwardingConfigure
Port Forwardingrules as below

Provision PostgreSQL Container
Before provisioning PostgreSQL container, we need to create a data container with a mounted volume which will be used to store the database that we create. Execute the below command to create a data container.
~:/> docker create -v /article_postgres_docker --name PostgresData alpineExecuting the below command with docker run will pull the image and start the container with name pgdocker. PostgreSQL stores its data in /var/lib/postgresql/data, so we are mounting the created data container volume with --volume-from flag. Also as seen we are exposing port 5432 (the PostgreSQL default) and running the container in detached (-d) mode (background). Password to be used for the database is configured with the environment variable POSTGRES_PASSWORD.
~:\> docker run -p 5432:5432 --name pgdocker -e POSTGRES_PASSWORD=password -d --volumes-from PostgresData postgresOptions passed:
--detach, -d- Run container in background and print container ID--publish, -p- Publish a container’s port(s) to the host--name- Assign a name to the container--volumes-from- Mount volumes from the specified container(s)--env, -e- Set environment variables
Running docker ps -a should list all containers. docker ps just shows containers running and not shows the volume that is created.
~:\> docker ps -a

CONTAINER ID        IMAGE               COMMAND                  CREATED             STATUS              PORTS                    NAMES
1f5ae3781326        postgres            "docker-entrypoint.s…"   5 minutes ago       Up 5 minutes        0.0.0.0:5432->5432/tcp   pgdocker
64773150d120        alpine              "/bin/sh"                8 minutes ago       Created                                      PostgresData
Options passed:
--all, -a- Show all containers (default shows just running)
Create database
Run the below command with docker exec to create testdb database with which we can play around.
~:\> docker exec pgdocker psql -U postgres -c "create database testdb"Connecting to the database from container shell
To start interacting with the database, we can use docker exec command to launch interactive shell running inside the container. Options -i allows us to make the container to wait for interaction from host but actual interaction from the console (terminal) is possible after we “allocate tty driver” with flag -t. This is an easy alternative to login to PostgreSQL and start exploring it.
~:\> docker exec -it pgdocker shOnce logged into shell, access psql terminal and try out few commands like listing databases, create table, insert data etc.,
# psql -U postgres
psql (12.2 (Debian 12.2-2.pgdg100+1))
Type "help" for help.postgres=# \l
List of databases
Name | Owner | Encoding | Collate | Ctype | Access privileges
-----------+----------+----------+------------+------------+-----------------------
postgres | postgres | UTF8 | en_US.utf8 | en_US.utf8 |
template0 | postgres | UTF8 | en_US.utf8 | en_US.utf8 | =c/postgres +
| | | | | postgres=CTc/postgres
template1 | postgres | UTF8 | en_US.utf8 | en_US.utf8 | =c/postgres +
| | | | | postgres=CTc/postgres
testdb | postgres | UTF8 | en_US.utf8 | en_US.utf8 |postgres=# select version();
version
------------------------------------------------------------------------------------------------------------------
PostgreSQL 12.2 (Debian 12.2-2.pgdg100+1) on x86_64-pc-linux-gnu, compiled by gcc (Debian 8.3.0-6) 8.3.0, 64-bit
(1 row)postgres=# \c testdbtestdb=# CREATE TABLE tbl_keyvalue (id int, key varchar(255), value varchar(255));
CREATE TABLEtestdb=# INSERT INTO tbl_keyvalue (id,key, value) VALUES (1, 'key1', 'value1');
INSERT 0 1testdb=# \dt
-- Lists all tables in the current database.
List of relations
Schema | Name | Type | Owner
--------+--------------+-------+----------
public | tbl_keyvalue | table | postgres
(1 row)Connecting to the database from SQL Client
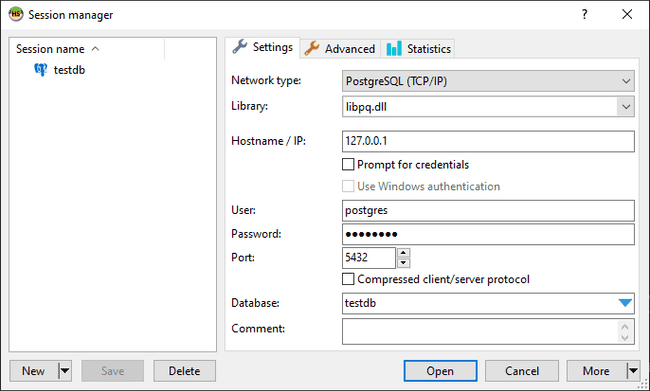
As we are exposing the default TCP port 5432 from provisioned PostgreSQL container, we can connect to it using any standard SQL client. For this article we shall use HeidiSQL, which lets us to connect to most of the database systems MariaDB, MySQL, Microsoft SQL or PostgreSQL.
Install HeidiSQL and start the application. This should open Session manager. Configure database connectivity details and open the session.
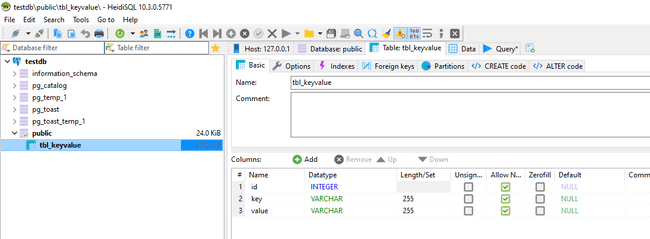
This should open up the application with tables listed under public section in the connected database.
Stopping and Starting container
As we mounted data container volume to persist PostgreSQL data, we will not loose data even after stopping and starting the database.
Execute the below commands to stop the container and start the container
~:\> docker ps -a
CONTAINER ID        IMAGE               COMMAND                  CREATED             STATUS              PORTS                    NAMES
9e4dab542448        postgres            "docker-entrypoint.s…"   9 hours ago         Up 9 hours          0.0.0.0:5432->5432/tcp   pgdocker
d29dc7a359c8 alpine "/bin/sh" 9 hours ago Created PostgresData~:\> docker stop 9e4dab542448~:\> docker start 9e4dab542448~:\> docker exec -it pgdocker sh
# psql -U postgres testdb
testdb=# \dt
List of relations
Schema | Name | Type | Owner
--------+--------------+-------+----------
public | tbl_keyvalue | table | postgres
(1 row)Discarding the container
Execute the below commands to stop and remove database container and its associated volume.
~:\> docker stop pgdocker~:\> docker rm pgdocker PostgresDataImport Schema & Data when provisioning new database
Generally whenever we are working on database for testing, we need to provision it with some base schema and test data. To try this out, we shall use PostgreSQL sample database that is available from one of the Github projects - Pagila which is a port of the Sakila example database available for MySQL.
Clone github repository to get the schema and data files to tryout importing them to the provisioned PostgreSQL container.
To bootstrap the database with cloned sql files, we need to create shell script which can be executed upon startup. Create bootstrap.sh file as below which will create database with the provided DB_NAME environment variable and import the schema and initial data using psql.
#!/bin/bash
set -e

POSTGRES="psql --username ${POSTGRES_USER}"

echo "Creating database: ${DB_NAME}"

$POSTGRES <<EOSQL
CREATE DATABASE ${DB_NAME} OWNER ${POSTGRES_USER};
EOSQL

echo "Creating schema..."
psql -d ${DB_NAME} -a -U${POSTGRES_USER} -f /pagila-schema.sql

echo "Populating database initial data"
psql -d ${DB_NAME} -a  -U${POSTGRES_USER} -f /pagila-insert-data.sql

echo "Populating database..."
psql -d ${DB_NAME} -a  -U${POSTGRES_USER} -f /pagila-data.sql
Create Dockefile as below to build the custom image. As observed, we are copying individual sql files to the image.
FROM postgres:11

# Custom initialization scripts
COPY bootstrap.sh /docker-entrypoint-initdb.d/bootstrap.sh
COPY pagila-schema.sql /pagila-schema.sql
COPY pagila-insert-data.sql /pagila-insert-data.sql
COPY pagila-data.sql /pagila-data.sql

RUN chmod +x /docker-entrypoint-initdb.d/bootstrap.sh && sed -i -e 's/\r$//' /docker-entrypoint-initdb.d/bootstrap.sh
/bin/bash^M: bad interpreter: No such file or directory issue will be thrown when bootstrap.sh file is created on windows and executed in docker container. We need to include sed command in RUN section in dockerfile to replace the line ending characters before executing bootstrap.sh file upon startup.
Execute the below command to create custom docker image with name postgre-pagila-db.
~:\> docker build -t postgre-pagila-db .Before starting the container, lets create a data container with a mounted volume which will be used to store the database that we create. Execute the below command to create data container.
~:\> docker create -v /article_postgres_docker --name PostgresData alpineExecuting the below command with docker run will use the custom image and start the container with name pgdocker-pagila-db. PostgreSQL stores its data in /var/lib/postgresql/data, so we are mounting the created data container volume with --volume-from flag. Also as seen we are exposing port 5432 (the PostgreSQL default) and running the container in detached (-d) mode (background). Database name and Password to be used for the database is configured with DB_NAME and POSTGRES_PASSWORD environment variable.
~:\> docker run -p 5432:5432 --name pgdocker -e DB_NAME=pagila -e POSTGRES_PASSWORD=password -d --volumes-from PostgresData postgre-pagila-dbLaunch shell and start exploring the database created with schema and data using below commands.
-- Launch shell
~:\> docker exec -it pgdocker sh

-- connect to psql terminal
# psql -U postgres
psql (12.2 (Debian 12.2-2.pgdg100+1))
Type "help" for help.

-- List databases
postgres=# \l
                                 List of databases
   Name    |  Owner   | Encoding |  Collate   |   Ctype    |   Access privileges
-----------+----------+----------+------------+------------+-----------------------
 pagila    | postgres | UTF8     | en_US.utf8 | en_US.utf8 |
 postgres  | postgres | UTF8     | en_US.utf8 | en_US.utf8 |
 template0 | postgres | UTF8     | en_US.utf8 | en_US.utf8 | =c/postgres          +
           |          |          |            |            | postgres=CTc/postgres
 template1 | postgres | UTF8     | en_US.utf8 | en_US.utf8 | =c/postgres          +
           |          |          |            |            | postgres=CTc/postgres
(4 rows)

-- Switch to pagila database
postgres=# \c pagila
You are now connected to database "pagila" as user "postgres".

-- List tables
pagila=# \dt
              List of relations
 Schema |       Name       | Type  |  Owner
--------+------------------+-------+----------
 public | actor            | table | postgres
 public | address          | table | postgres
 public | category         | table | postgres
 public | city             | table | postgres
 public | country          | table | postgres
 public | customer         | table | postgres
 public | film             | table | postgres
 public | film_actor       | table | postgres
 public | film_category    | table | postgres
 public | inventory        | table | postgres
 public | language         | table | postgres
 public | payment          | table | postgres
 public | payment_p2017_01 | table | postgres
 public | payment_p2017_02 | table | postgres
 public | payment_p2017_03 | table | postgres
 public | payment_p2017_04 | table | postgres
 public | payment_p2017_05 | table | postgres
 public | payment_p2017_06 | table | postgres
 public | rental           | table | postgres
 public | staff            | table | postgres
 public | store            | table | postgres
(21 rows)

-- Clear screen
pagila=# \! clear
Perform database operations
Let’s perform some database operations on the provisioned database with schema and data.
-- list 5 actors
pagila=# select * from actor limit 5;
 actor_id | first_name |  last_name   |      last_update
----------+------------+--------------+------------------------
        1 | PENELOPE   | GUINESS      | 2017-02-15 09:34:33+00
        2 | NICK       | WAHLBERG     | 2017-02-15 09:34:33+00
        3 | ED         | CHASE        | 2017-02-15 09:34:33+00
        4 | JENNIFER   | DAVIS        | 2017-02-15 09:34:33+00
        5 | JOHNNY     | LOLLOBRIGIDA | 2017-02-15 09:34:33+00
(5 rows)

-- update an actor first_name
pagila=# update actor set first_name='EDWARD' where first_name = 'ED';
UPDATE 3

-- Verify if record is updated
pagila=# select * from actor where actor_id=3;
 actor_id | first_name | last_name |          last_update
----------+------------+-----------+-------------------------------
        3 | EDWARD     | CHASE     | 2020-03-09 01:42:44.975053+00
(1 row)
Conclusion
This article is more of a little hack on making our application development faster by quickly setting up database of our choice without worrying on annoying steps on installing and configuring the database. As PostgreSQL is one of the more common used databases, having it provisioned with Docker and connecting to our local application is quite simple and easy.


